Quick Answer
The three most damaging technique faults in masters rowing are: late catch (blade enters after legs start driving), early back opening (back pivots before legs finish), and rushed recovery (racing to the catch instead of controlled preparation). These errors waste power, increase injury risk, and get worse under fatigue. All three are fixable with specific drills and deliberate practice.
The Three Critical Faults
Fault #1: Late Catch (The Slip)
What it looks like: Your blade enters the water after your legs have already started pushing. The first few centimetres of leg drive happen with the blade in the air or just touching the surface.
Why it happens:
- Rushed recovery that doesn't allow proper catch preparation
- Mistiming between arms lifting the handles and legs initiating drive
- Trying to "grip" the catch with body momentum instead of blade placement
The cost:
- Lost drive length (2-3 cm minimum up to half slide wasted)
- Weak, slipping catch that does not move the boat forwards
- Inconsistent rhythm and timing
- Slower splits for same effort
How to identify it:
- Video yourself from the side, watch blade entry relative to leg movement
- Listen for the seat changing direction (there's a moment of silence) and your oars must already be under the water at this point
- No backsplash sound from the catch placement
The fix:
Drill: Pause at Half Slide
- Row with normal recovery to half slide position
- Pause with body rocked forward, arms extended, but slide stopped
- Square the blade and hold for 2 seconds, blade hanging just above water
- Roll up to the catch and drop blade in, then drive the legs
- Repeat 20 strokes, focusing on early square and blade-first entry
Drill: Arms-Body Only Rowing
- No slide, legs stay extended
- Row with arms and back swing only
- Focus on blade dropping in when arms and body fully extended
- Feel immediate engagement, no slip. Slow it down.
- 1 minute rowing then go to half slide and then full slide normal rowing for 4 minutes at rate 18-20
Mental cue: "Blade, then legs" not "legs and blade together"
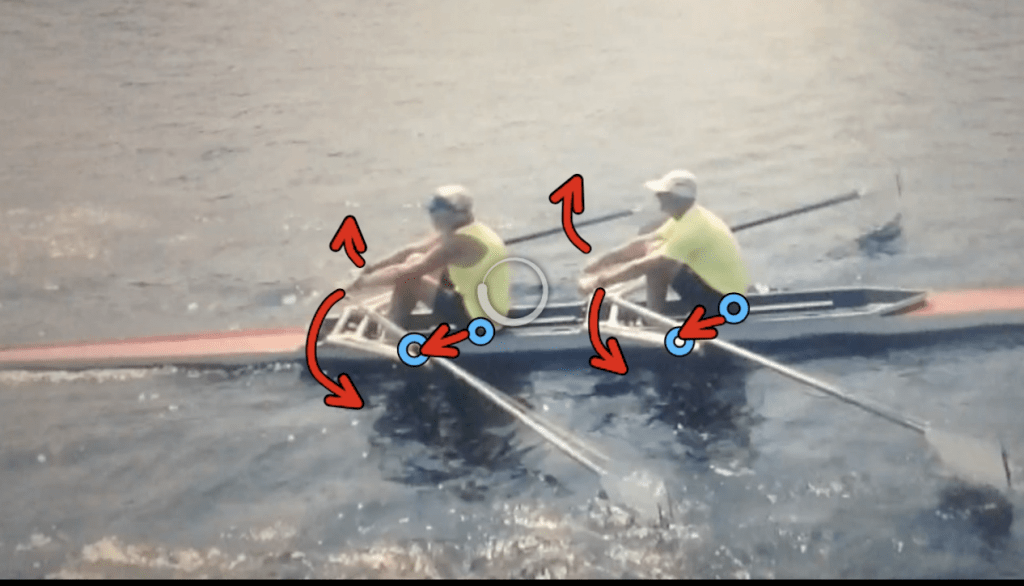
Fault #2: Early Back Opening
What it looks like: Your back begins pivoting open before your legs start driving. You're essentially trying to "lift" the load with your lumbar spine instead of transferring leg power. It's easy to do because when you shoulder lift, you can really feel the connection with the oar in the water.
Why it happens:
- Desire to get a grip on the water at the catch (this is easier to feel with a shoulder lift)
- Poor understanding of proper sequencing
- Habit from years of doing it wrong
The cost:
- Massive shear forces on L4-L5 vertebrae
- Chronic lower back pain and injury risk
- Wasted leg power (strongest muscle group underutilised)
- Less back swing later in the power phase (you can only use each body part once per stroke)
- Slower boat speed despite hard effort
How to identify it:
- Video from the side, watch when back angle changes relative to leg extension
- Check for early shoulder rise at the catch
The fix:
Drill: Legs-Only Rowing
- Start at catch position, arms straight, back angle set leaning forward
- Drive with legs only, keeping body angle completely fixed
- Back stays at catch angle until legs are straight
- If the handle reaches your knees you have used your back (may be unknowingly)
- 1 minute practice legs only then 1 minute normal rowing until pattern is automatic
- Try this on the erg with a mirror
Fault #3: Rushed Recovery
What it looks like: Your slide speed on recovery is as fast as your drive speed. You're racing back to the catch, creating a hard, uncontrolled collision at the front end and pushing the stern into the water which slows the boat.
Why it happens:
- Anxiety about "getting there" for next stroke
- Trying to row at rate higher than current technique supports
- Poor ratio understanding (recovery should be 2-3x longer than drive at low rates)
- Compensating for other technical faults like squaring late
The cost:
- Forces you into poor catch positions
- Creates violent, injury-risking catch entry
- Wastes energy and slows the boat down as mass moves sternwards
- Disrupts boat rhythm and run
- Sets up other faults (late catch, late square)
How to identify it:
- Video from the side, compare drive speed to recovery speed
- Recovery should look slow, controlled, deliberate
- Stern dips into the water before the oars are covered at the catch
The fix:
Drill: Ratio Rows
- Count to 1 on the drive
- Count to 1-2-3 on the recovery
- Deliberately slow the recovery, feel the control
- 15 minutes at rate 16-18
Drill: Pause at Hands Away
- Normal drive and release
- Pause when hands clear knees, before body rocks forward
- Hold 2 seconds, completely still
- Then body rocks, pause a second time, then slide
- Forces slow, controlled recovery sequence
Mental cue: "Quick drive, slow recovery" not "race back to the catch"
Secondary Faults (Still Important)
Over-Compression at the Catch
The problem: Sliding so far forward that your knees are past your toes, shins angled back toward stern.
Why it's bad:
- Puts knees in biomechanically compromised position
- Last 2-3cm of slide contributes minimal power but maximum joint stress
- Often paired with rounded lower back to achieve compression
The fix:
- Reduce slide length by 2-3cm (put tape around the slide so you feel it with the wheels)
- Shins should be vertical at catch
- Accept that you lose marginal length to gain healthy knees
Poor Release Mechanics
The problem: Hands push down and body swings forward before arms are fully straight creating a rushed recovery.
Why it's bad:
- Sets up rushed recovery, arms/body lunging towards the catch
- Disrupts rhythm and loses boat run
The fix:
- Extract the oar from the water and fully straighten arms before swinging shoulders forwards
- Blade should extract cleanly with minimal disturbance
- Body should be still and leaning back towards the bow
- Practice release sequencing drills daily until automatic
Grip Issues
The problem: Death grip on handle, white knuckles, forearm pump after hard pieces.
Why it's bad:
- Wastes energy on unnecessary tension
- Limits blade feel and control
- Can lead to forearm, wrist, elbow issues
- Indicates overall tension throughout stroke
- Reduces the weight in hand control of the oar handle
The fix:
- Loose grip on recovery, fingers just hooked over handle and in sculling the palm barely touches the handle
- Firmer grip with a finger hook only at the catch and through drive
- Imagine holding a small bird, firm enough to control, gentle enough not to crush
- Check grip tension every 10 strokes or "play the piano" wiggling your fingers on the recovery
Lack of Back Swing
The problem: during the power phase the back doesn't swing dynamically and add to the stroke power.
Why it's bad:
- Less boat speed than you could have
- Finishing sitting upright means you don't get a forward swing on the recovery
- Glutes don't engage and connect the legs to the back in the power phase
The fix:
- Drill: Row with body swing only (straight arms and straight legs)
- Check you swing back the same angle you swing forward
- If you open the back early at the catch you cannot use your back swing later in the drive (each body part is used once per stroke)
- Tighten tummy muscles as you swing your back to check it's activating on the power phase
The Compounding Effect
These faults rarely exist in isolation. Usually, one fault causes another:
Common chain: Rushed recovery → Late catch → Early back opening → Poor release → Rushed recovery...
Breaking the cycle:
- Start with recovery control (easiest to change consciously)
- This aides catch timing as preparation is done earlier on the recovery
- Which allows proper power phase sequencing
- Which sets up clean release
- Which enables controlled recovery
Timeline: Expect 6-8 weeks to automate new patterns. First 3 weeks feel awkward and slow. Weeks 4-6, things click. Weeks 7-8, new pattern is natural and faster than old technique.
How to Fix Your Technique
The Video Analysis Protocol
Frequency: Film yourself every 2 weeks
Setup:
- Side angle (perpendicular to boat/erg)
- Capture three full stroke cycles
- 5+ continuous strokes at low rate
- Various intensities (easy, steady, hard)
What to watch for:
- Blade entry relative to leg drive start
- When back angle changes relative to leg extension
- Recovery speed vs. drive speed
- Body positions (catch, release, recovery)
- The triangles of back:legs and shins:legs
Compare to: Exemplar technique videos (Olympic rowers, elite masters)
The Practice Structure
Every session starts with technique:
- 15 minutes dedicated drills while you warm up
- Before any intensity work
- When you're fresh and can focus
Progression:
- Week 1-2: Isolation drills (legs only, arms only, pause drills)
- Week 3-4: Integration drills (adding pieces together)
- Week 5-6: Pressure application (technique at intensity)
- Week 7-8: Racing application (technique under fatigue)
Maintenance:
- Even after technique is fixed, continue daily drill work
- 10 minutes minimum to maintain patterns
- Technique degrades under fatigue without consistent practice
Working with a Coach
If you're struggling to self-correct:
- Single session video analysis can identify your specific faults
- Coach provides external feedback you can't see yourself
- Correction cues personalised to your patterns
- Accountability to actually implement changes
Cost: $50-$150 for one-off analysis, worth it if you're stuck.
Should I hire a rowing coach as a masters athlete?
The Performance Gain
Fixing these three faults typically results in:
- 5-10 seconds improvement on 1K (from efficiency alone)
- Lower injury risk (especially back and ribs)
- More sustainable power application
- Better technique under fatigue
- Faster improvement from training (not fighting poor mechanics)
Timeline:
- Weeks 1-3: Feels slower, awkward (relearning phase)
- Weeks 4-6: Feels smoother, splits improving
- Weeks 7-8: Faster than before with better technique
- Month 3+: Technique is automatic, continuous refinement
Related Questions
- Why does my lower back hurt after rowing and how do I fix it?
- My knees hurt when rowing, what am I doing wrong?
- Should I stop rowing if my back/ribs/knees hurt?
- Best rowing technique to avoid back injury
Professional Technique Guidance
Our Technical Drills Videos provide:
- Progressive drill sequences to fix each mistake
- 20+ drills with coaching cues and demonstrations
- Common fault identification guide
Stop fighting poor mechanics. Fix them once, benefit forever.
Join our newsletter for weekly technique tips and drill progressions.