Quick Answer
Lower back pain in rowing typically stems from two technical errors: excessive lumbar flexion (rounding) at the catch, and early back engagement during the drive. Both create compressive and shear forces on your lower spine. The fix requires specific technical adjustments and targeted strengthening, definitely not just "rowing through it" or stopping entirely.
The Root Causes
Cause 1: Rounded Lumbar Spine at the Catch
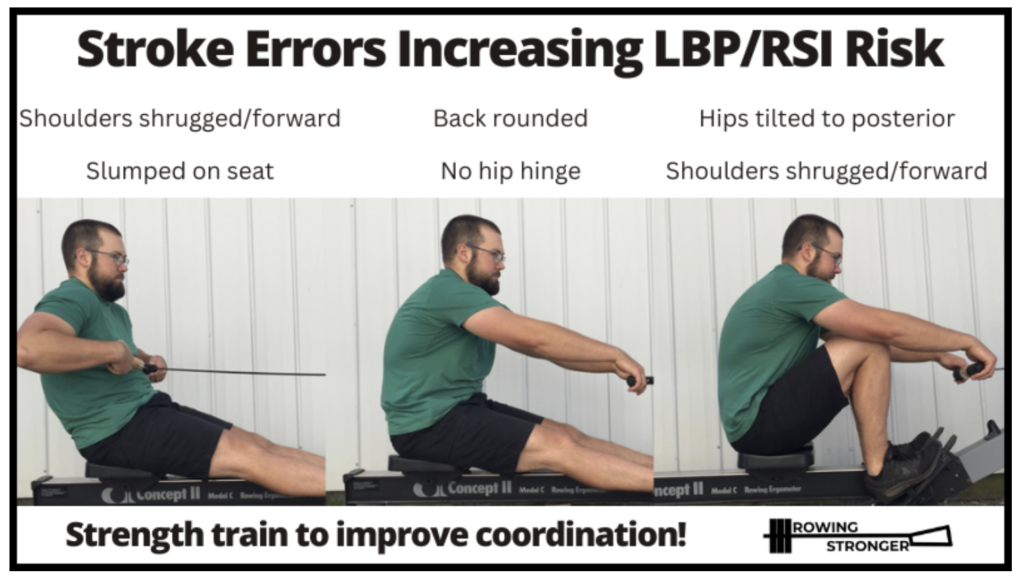
What's happening: You're reaching forward with a rounded lower back instead of maintaining a neutral spine. Every stroke creates hundreds of pounds of compressive force through your lumbar discs.
Why it hurts more after 40: Your spinal discs have less water content and reduced shock absorption capacity. The same position that you "got away with" at 25 now creates pain and potential injury later in life.
Visual check: Have someone video you from the side. At the catch, if your lower back is rounded (shoulders hunched toward knees), you've found your problem.
Cause 2: Early Back Opening
What's happening: Your back opens before your legs finish driving. You're essentially trying to "lift" the load with your lumbar spine instead of transferring power from your legs.
The force problem: This creates massive shear forces on L4-L5. Multiply by 10,000 strokes per week, and you have chronic low back pain.
Feel check: If your lower back fatigues before your legs during a hard piece, your sequencing is wrong. If your lower ribs touch your thighs when you are at the catch and they stop touching early, chances are you lifted your shoulders to start the power phase.
Cause 3: Weak Deep Core Stabilisers
What's happening: Your superficial abs (six-pack muscles) work fine, but your deep stabilisers (transverse abdominis, multifidus) are weak. These muscles should stabilise your spine during the rowing stroke.
Why this matters: Without deep core stability, your spine moves too much during the stroke, creating irritation and inflammation.
Cause 4: Tight Hip Flexors or Hamstrings Limiting Range
What's happening: Tight hip flexors prevent full hip flexion at the catch, or tight hamstrings prevent pelvic rotation so you compensate by rounding your lower back to achieve compression.
The compensation: Your body finds range of motion somewhere. If your hips can't flex enough, your spine flexes instead, and that hurts.
The Fix: Technical Corrections
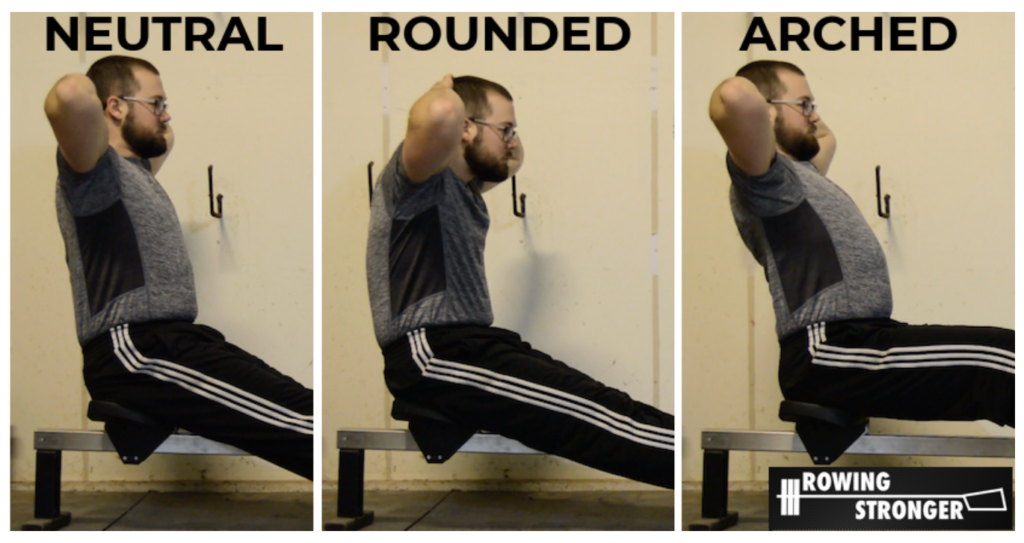
Fix 1: Neutral Spine at the Catch
Setup position:
- Sit tall with sternum lifted
- Maintain natural curve in lower back
- Think "chest to knees" not "shoulders to knees"
Key cue: Your forward reach comes from hip flexion (folding at the hips), not spinal flexion (rounding your back).
Trade-off: You may lose 1-2cm of reach. You'll gain 10+ years of healthy rowing.
Practice drill:
- "Pause at arms and body" drill
- Hold catch position for 3 seconds before drive (on the erg)
- Check that your back is straight, not rounded on the recovery and the drive
- Only add drive once position is correct
Fix 2: Proper Drive Sequencing
Correct sequence: Legs → Back → Arms
Not: Everything opens at once, or back-before-legs (shoulder lifting)
Practice progression:
- Legs-only rowing: Drive with legs while keeping body angle fixed at catch. The handle should be still over your shins when you take the oar out of the water, if the handle is over your thighs - you swung your back.
- Straight arm rowing: Drive with legs while keeping body angle fixed at catch, add in your back swing when the legs are nearly straight but keep the arms straight. Then return to the catch. Try to delay your back swing until your leg drive is nearly complete.
- Integrated stroke: Maintain sequencing at full pressure and low rate
Mental cue: "Push then swing" not "lift and pull."
Feel check: Your hamstrings and glutes should fatigue before your lower back. If your back is screaming and your legs feel fresh, you're still sequencing wrong.
Fix 3: Controlled Recovery
Why this matters: A rushed, uncontrolled recovery forces you into poor catch position, which creates the back pain downstream.
Recovery principles:
- Hands away first while still leaning backwards in your finish position
- Body follows hands (pivot from hips). Feel your body weight on the front of the seat.
- Slide last (controlled, not rushed)
Ratio: Recovery should be 2-3x longer than the drive at low rates If your drive is 1 second, recovery should be 2-3 seconds.
The Fix: Strengthening Protocol
Core Stability Work (Daily, 10 minutes)
Dead bug progressions:
- Lying on back, extend opposite arm and leg
- Hold for 5 seconds, maintain neutral spine
- 3 sets of 10 reps each side
Bird dog:
- On hands and knees, extend opposite arm and leg
- Hold for 10 seconds, don't let hips rotate
- 3 sets of 8 reps each side
Plank variations:
- Front plank: 3 x 30-45 seconds
- Side plank: 3 x 20-30 seconds each side
- Focus on maintaining neutral spine, not duration
Key principle: Quality over quantity. Perfect position for 20 seconds beats sloppy form for 2 minutes.
Hip Flexor Mobility (Daily, 5 minutes)
Kneeling hip flexor stretch:
- Kneeling lunge position
- Tuck pelvis under (posterior tilt)
- Lean forward until you feel stretch in front of hip
- Hold 90 seconds each side
Couch stretch:
- One knee on ground against wall, other foot forward
- Upright torso
- Hold 2 minutes each side
Goal: Improve hip flexion range so you don't compensate with lumbar flexion.
Posterior Chain Strength (2x per week)
Deadlifts or Romanian deadlifts:
- 3 sets of 8-10 reps
- Focus on hip hinge pattern, neutral spine
- This teaches your body the proper movement pattern
Single-leg deadlifts:
- 3 sets of 8 reps each leg
- Builds unilateral strength and stability
Glute bridges:
- 3 sets of 12-15 reps
- Activates glutes that should be driving the stroke
The Recovery Protocol
If You're Currently In Pain
Go and see a medical professional who is sports-trained. A family doctor or general practitioner is not suitable for sports injuries. Be proactive - seek a physical therapist who understands rowing. Physiotherapy, osteopathy, chiropractic and sports massage experts may all be suitable for you. Find one who helps your condition - do ask other rowers who they use.
It's important to get injuries seen quickly - do not wait two weeks and hope the pain subsides using pain medication.
Training recovery protocol
Week 1-2: Reduce volume by 50%, focus on technique at low intensity Week 3-4: Gradually increase volume if pain is resolving Ongoing: Maintain technical precision even when fatigued
Warning signs to stop:
- Sharp, shooting pain
- Pain that gets worse during session
- Pain that persists more than 24 hours after rowing
Anti-inflammatory Support
Immediately after rowing:
- Ice for 15 minutes if inflamed
- NSAIDs if needed (not as routine prevention)
Ongoing support:
- Adequate sleep (7-9 hours)
- Anti-inflammatory nutrition (omega-3s, reduce processed foods)
- Stay hydrated
Prevention: Long-Term Solutions
Foot to Seat Position
Check your settings: Lower your feet - the measurement of shoe heel cup to seat top is what you need to know. And/or use a seat pad to raise your seat further. This effectively improves your compression by making it easier to tilt the pelvis. This can eliminate the need to over-reach into problematic positions.
Heel position: If your heels are popping up early in the drive, your stretcher may be too high, forcing you into excessive forward lean.
Regular Assessment
Monthly video analysis: Have someone film your stroke from the side. Watch specifically for:
- Spinal position at catch
- When your back begins opening relative to leg drive
- Recovery control and catch preparation - pelvic tilt
Maintenance work: Even when pain-free, continue daily core stability and hip mobility work. Prevention is easier than cure.
Related Questions
- Best rowing technique to avoid back injury
- What are the most common technique mistakes in masters rowing?
- Should I stop rowing if my back/ribs/knees hurt?
- My knees hurt when rowing - what am I doing wrong?
Professional Technical Guidance
Lower back pain is almost always fixable with proper technique and strengthening. Our Technical Masterclass include:
- Video analysis of proper vs. improper positions
- Progressive drill sequences to learn correct mechanics
- Specific strengthening protocols for lower back health
- Functional Movement Assessment - test how well your body moves
Don't row hurt. Fix the mechanics.
Join our newsletter for technique tips and injury prevention strategies delivered weekly.