What's the drill for? How to use it to improve your skills and errors to watch out for.
Timestamps
We do them for crew alignment, blade handling, technique, isolating part of the stroke or exaggerating part of the stroke to amplify its effect. The pick drill sequence - often used as part of the warmup.
This starts at the catch - sitting at full compression. Start with a very short stroke (2 inches of the slide). Some like to start with a blade placement before this stage.
04:45 What's the drill for?
1) Placing the blade before the leg drive begins. Some people assume the blade placement and leg drive are simultaneous. They are not. These are sequential movements - on the recovery your hands move upwards so the blade goes down towards the water while still moving forwards on the slide.
2) Get the correct sequencing off the catch - legs initiate the drive and back/arms follow.
The effect of this drill is to make a longer stroke if the blade is placed more rapidly and closer to full compression on the legs (so you miss less water). It helps to align the leg drive of the crew.
Coaches - view your crew from 45 degrees from the stern to watch their knees rising and falling through the stroke cycle. Video the crew before and after the drill - their knees press down in the power phase more in time with each other. When to coach an individual versus whole crew.
08:15 How to teach the reverse pick drill
You need to slow it right down and, if possible, in a stable environment with half the crew sitting out. So others can use square blades.
Rehearse each of the static positions slowly with the boat stationary. They must all know these first - start at the catch (blade square and buried); move to 2 inches from the catch; one quarter from the catch; half slide from the catch; three quarters slide from the catch; legs only. [Watch for people swinging their back - this is not needed at this stage.] Straight arm rowing and finally adding the arms so you end the drill at the finish position with the blade still buried under the water. Rehearse each several times.
10:30 Start to do the drill at the catch placement into the water with raising and lowering the blade in and out of the water. Watch for shoulder shrugs and folks using a back swing to place the blade rather than the arms lifting moving alone. Move onto 2 inches on the slide. Show the athletes how to push on the foot stretcher to initiate the drive phase. Emphasise the hips driving backwards and the body angle doesn't change.
11:30 Many people find it difficult to separate the leg drive from the body swing. Watch for chins lifting if this happens.
12:15 Best not to do more than 10 strokes at each position. It's a lot of load on the body. The gearing is heavy which helps them to feel the blade in the water but beware causing back strain. Inflexible athletes will find it hard to get into these positions, especially if hip / pelvis mobility is restricted.
Article on easy setup for comfort in the boat - Adapting rowing for masters physiology.
Join in the rest of the crew progressively so that the people who have done the drill are are focused on their catch and leg driven power phase - as the boat moves faster, they will find it more challenging to get the same feeling of placement and "grip" on the water before it moved. They can anticipate the catch and adjust their timing to keep the feeling of load.
15:00 Repeat the drill three times during an outing.
Teaching it on the land first using an erg can be helpful as you can get up close and position an athlete's body. How to get the athlete to learn the leg drive using hips first.
16:00 Errors to watch out for
18:30 This drill benefits from frequent practice. Maybe use it in your warm up or on the erg.
The benefits of drills and ways to improve your rowing boat skills.
02:00 Skills in the boat.
You have to spend time in the boat to acquire skills. What is your available time for practicing? Choose frequency over long outings. If your crew practices 3 times a week, can you add in a short single sculling outing alone to develop your skills?
Use structured exercises to learn the pattern. Execute all your drills to a high level of skill - move carefully and deliberately.
05:00 Check your static position first at the finish at the start of the outing. Re-check each outing, especially if your crew lineup has changed.
06:15 Have a plan. Don't just go through the motions thoughtlessly.
Pick drill has a purpose. It's a drive suspension drill and also to warm up your body. Be mindful in the boat with your movements. Develop your skills - check your adjustment each outing. Rushing into the outing may not be helpful.
08:30 Skills progression for masters rowers. Faster Masters has written a progression of skills from Beginner, intermediate and through to advanced skills. This is the first time we have ever seen a detailed list which athletes can use to track their progress - tick each one off as you learn.
10:00 How a coach can use the skills progression with a group.
Know what each athlete needs to learn NEXT. More experienced athletes can process more coaching input. Beginners don't need the why. Just orient them to the boat and the stroke to begin with - introduce the why later on. When the coach focuses on the least experienced first it can mean the more experienced don't get coached.
Different skilled athletes in one crew, use the drill to coach both inexperienced and experienced people giving them both something to work on in the drill.
16:00 Getting a new crew together using these four drills to align stroke patterns.
How to get the skills drill progression document. It is part of the Masters Coaching Certification course.
Nobody wants to look like a lump clumbering around. So what's the best way to get into a single? And how can you adapt that if your mobility isn't what it once was?
01:00 Single sculls - how to feel safe getting in and out.
02:45 The basic method demonstrated by Nathan Benderson Park - How to: 3 ways to board a rowing scull.
05:30 She makes useful remarks about how the wind is pushing the boat away from the dock and how to ensure it doesn't drift away while you are getting into the boat. Get into the habit of first assessing the wind and weather conditions before getting on the water. This is a good safety practice.
06:30 Hold the handles WITHOUT your finger between the grips. A better way to hold the scull handles when getting in and out of the boat. Create a triangle of strength with the oar handles to make the boat more stable.
07:40 Getting into a single from a seated position.
Position the oars in the same way as for the basic method above.
09:45 Rowing with adaptations
Athletes with knee issues won't be able to do this seated method. Know some variations which you can suggest to these folks. It's important they feel safe getting into a single scull.
12:15 Swan poo on the dock. Add cut down yoga mats to the dock so you can sit / kneel on a clean surface.
John Tracy - the standing push off method of getting into a single scull.
15:30 Push out the water side scull, position the seat and place one foot on the deck of the boat.
19:15 Other considerations - once you have the basics. Get a friend to be nearby to catch a rigger if you get unbalanced. Boats tip a lot before you fall in - try rigger dipping. Work out how far you can tilt the boat before you fall in.
Get in and out of your boat safely is a good way to learn boat handling skills. These promote safety and control in different weather conditions.
Going deep is a common technique issue, as is "corrugating" through the drive where the blade goes deeper and shallower. In this podcast Marlene and Rebecca discuss how to get a horizontal drive in the rowing and sculling stroke.
02:00 Why it matters? Stroke length is important for rowing and sculling. How long the blade stays in the water at one depth. If your depth varies you have a shorter stroke.
05:30 Coming over your knees the blade can go deep. Also on the placement if can go deep if you shoulder lift to place the oar.
07:30 Tape on the shaft at the correct depth is a useful visual marker.
09:00 check your rig FIRST.
Oarlock height is key. In 1x at the finish check the handle height while stationary - your forearms should be parallel to the water.
13:00 Drills to stay horizontal.
1) One finger rowing drill - what it feels like to stay level on the drive. Draw through with only your middle finger on the handle. The water supports the blade to stay level - if you allow it.
2) Aim for where your knees were. Drive your knees away from your chest and keep your body leaning forward at the catch angle.
3) Row with blades flat on the water to see where the handle is at the catch against a visual marker. Your handle stays the same height through power phase and recovery during this drill. You can do this on erg - use tape to mark the chain / handle height
20:00 Benefits of staying horizontal. Get a longer drive. Look at your blade to check as you re-pattern your movements.
Blade depth on the drive | Faster Masters Rowing Radio.
Support this show with a donation if any of the information is helpful for your rowing.
02:30 What should your blade depth be?
Keep the top edge consistent, level and covered by the water at this height through the drive. Important for an effective drive. It affects the length of time the oar is in the water.
04:00 common errors with blade depth
The blade has floatation and will sit in the water at the correct height if you just leave it sitting there with no pressure. Add pressure to the blade does bury it a little more.
2. Lifting the hands too high causes deep blades.
Use the reference point for the handle “aim for where your knees were” Norm Graaf's advice.
3. Opening up the body too early on the drive sequence.
If the body lifts away from the knees this causes the blades to go too deep “rowing up over the barrel”.
4. The blade is not fully square when it goes into the water.
This causes it to dive deep. Is there enough height above the water to square on the recovery? A solution is to relax the handle. If you hold too tightly the water isn’t able to fix the blade depth and square placement.
09:30 Drills and skills to build blade power
1. Row in circles
Leave one blade flat on the water with the handle next to your body. Row with the opposite hand. Watch your blade as you row - make corrections to the depth. Check the waterline on the oar shaft - it should stay consistent until the oar comes out of the water.
2. Backing down drill
13:45 Backing down drill
Keep the blades in the same position as you row (don’t counter-feather). Build your confidence increasing the stroke length from arms only to full slide backing. You can see your blades as you back.
Practice the correct recovery sequence - arms / body / legs flow up the slide as your hands separate. Practice in sweep and sculling boats.
3. Half blade depth drill
16:30 Half blade depth drill
Row with your oars half way out of the water. Requires more control over the oar - finesse. You can’t row hard but allows you to practice the handle control. Practice full blade depth as well.
4. Bungee rowing drill
20:00 Put the elastic bungee to the stern of your foot stretchers. This slows down the boat on the recovery and gives you resistance feedback.
Try rowing one stroke with power and one light pressure easy alternating. Goal is to apply pressure to the handle keeping the blade at the correct depth.
4 sets of 8-10 strokes focusing on higher power.
5. Vary pressure through the stroke drill.
21:45 Change from quarter to half pressure (50%) at the release. Row 20 strokes with this focus.
Then go from 50% up to 75% pressure at the release. Maintain handles horizontal and drive length through the water. Lastly try 75% up to 100% full pressure.
6. The silent pyramid exercise
23:30 This helps build up to full pressure strokes; it also helps concentration. Start with 1 stroke with power and 1 stroke easy light pressure; then 2 on and 2 off; 3 on / off;
Up to 10 strokes with power and 10 strokes off easy - then work your way back down the pyramid, 9 - 8 - 7 down to 1 stroke.
26:00 Managing training with long Covid
The effects take a long time to recover after illness. A useful measurement is heart rate variability. Morning resting heart rate gives you a norm. If you are fatigued from training this will change - elevate.
Rule of thumb 5 beats above normal you should take it easy that day or do a light training to keep your heart rate low.
28:30 Heart rate variability - measures the amount of time between heart beats. This reacts to how much fatigue you have and indicates if your body is in a relaxed or stressed state. It indicates whether your sympathetic nervous system is over-active (fight or flight). In a relaxed state your parasympathetic nervous system is activated.
Measure using an app like HRV4Training it measures heart rate and asks questions about your lifestyle - sleep, training, injury. The factor is personal to you and indicates what’s normal for you.
In our final instalment about the rowing and sculling stroke we will focus on holding the handle(s).
01:00 This Past Week - what we do to advocate for masters rowing.
12:00 Hand placement and grip. In our final instalment about the rowing and sculling stroke we will focus on holding the handle(s).
Establish your hands correctly or end up under or over-rotated.
Find the right place - sit at 3/4 slide and place the blade in the water square. Put your hand on the handle and ensure your wrist and hand back are flat.
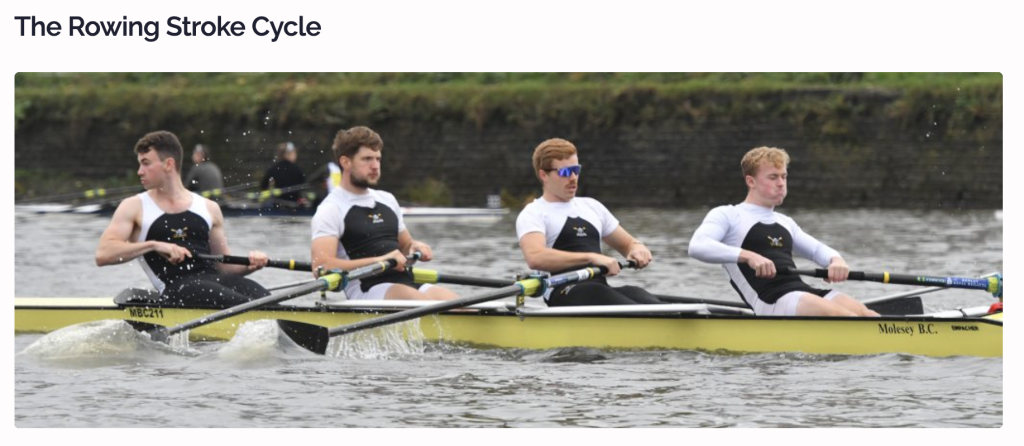
Read and watch the full video series on the rowing stroke cycle - 6 episodes from catch to finish.
The top row of knuckles is on top of the handle - not in your palm, not in the tips of your fingers.
15:00 Learn to move the handle in your hand not your handle with your hand.
16:00 Open versus closed grip
19:00 You don't need to grip the handle - you guide it.
Water supports the blade in the water.
Oarlock supports the blade on the recovery
How tight to hold the handle?
21:00 How much pressure to put on the handle?
23:00 The sweep grip. How wide to hold the handle.
Inside versus outside hand roles.
Avoid wrist tendonitis by taking the load with your back / shoulder not your wrist.
27:00 Cranking your wrist with pressure stresses the carpal tunnel - the "Harley Davidson Method".
Use an elastic band as a guide for you hand if you move it around during the stroke or it drifts.
In sweep the grip effectiveness changes from outside hand to inside hand as you move from catch to finish.
Don't let you hand come off the handle as you get to the placement.
30:00 Drills for grip
34:30 Posture in rowing
The extremes are the gymnast and the couch potato.
Pick a mid point.
Work on your posture all the time. Not just in the boat.
In the car - adjust the rear view mirror; use the head rest so you sit with your ears over your hips; neutral spine is more resistant to injury.
38:00 During the drive phase you don't want pressure on your vertebrae you want it through your hips.
Keep low back supported
Make posture a habit in your daily life.
Further resources
A coach’s eye on your blade keeps technical crabs at bay during a practice. But if you’re out alone you need a way to self-coach. As a part of your daily warm-up choose a drill that gives you clear feedback and sets the tone for your row.
Here are a couple of suggestions.
Feet-out rowing focuses on a clean release of the blade using the support of the water to assist the exit. The drill helps you row, tall preventing your weight from falling into the bow. Remove your feet from the shoes and place them on top of the stretcher. During the drive hold steady pressure against the foot stretcher and as you draw the oar handle. Tap down on the oar handle to release the blade in sync with legs down; just before you lose the pressure on the blade. Keep your weight over the handle as you then feather as the hands move away from your body. If the release is late, your feet will come off the shoes, and going in the water is likely. If you nail it, it’s crisp and feels easy. Practice rowing slowly for 10 minutes feet-out.
Rowing with a pause at one-quarter slide helps you practice rowing with a quiet upper body on the recovery. Transition smoothly from the drive to the follow-through position of arms-body away. When your knees rise slightly at one-quarter slide, pause. Let the boat glide for a count of one-one thousand, two-one thousand, then row on. Keep your upper body quiet and steady as you compress on the slide. Let the knees come up to your chest versus the chest dropping to the knees as you get ready to place the blade. Practice sets of 10 strokes.
If it helps you to focus, give yourself a score out of 10 for each set of the drill you do. Mark your improvement. If you don’t get better, it may be time to head in to the dock and practice again another time. Practicing rowing wrongly will not be helpful in the long term and a tired body and mind finds challenging drills very hard to do successfully.
Would you like to publish this article in your club newsletter or website?
Join our Masters Rowing Advocates mailing list and we will send you one article a month. Sign up on our Advocacy page.
You can copy the text on this page. Or download the PDF.
Quiet refined bladework is the signature of a skilled oarsman. Turbulence and splashing at the tip of your oar sends a big hit of drag to your boat speed. The standard of your feathering motion may not be at the top of your technical to-do list but, how you change the position of the blade from square in the water during the drive to the horizontal, flat position when the oar is out of the water on the recovery, makes or breaks the release. If your blade exits the water cleanly, without catching its lower edge or throwing a lip of water, your hull is going to carry the power of your drive into the recovery. Any interruption as it attempts to exit will steal the speed you have built up through the drive.
Common flaws in feathering are turning the blade while it’s still under the water before the blade has exited the water and feathering as the hands are continuing towards your body at the end of the drive. At this point, the blade is no longer working in the water but the handles continue moving towards the body as if on the drive.
First, complete your release by pressing down on the handle, take the blade out of the water until you clear the lower edge of the blade. If the blade is still loaded it will facilitate coming out square. Once clear, feather the oar as your hands move away from your body. Once the blade is released, aim for the feathering motion to happen on the recovery as the blade tip is moving towards the bow.
Practicing a new pattern is best done stationary at first, so watch your blade to check and reinforce that you are releasing completely then changing the direction of the blade after the oar has exited. If you are sculling you can practice rowing circles with one oar and focusing on the sequencing. When you row continuously, exit with the blade square and delay the feather until your hands start to move away from your body and lead into the follow-through motion.
Would you like to publish this article in your club newsletter or website?
Join our Masters Rowing Advocates mailing list and we will send you one article a month. Sign up on our Advocacy page.
You can copy the text on this page. Or download the PDF.
Missing buoys, steering off course, falling out of your boat, being late to the start, rushing the slide, or stopping too soon before the finish line are only a few of those rookie mistakes common to the new competitive sculler.
The skills of racing a single scull take time to develop because it is a delicate combination of fitness, technique, mental preparation, tactics, and navigation. If you are new to competitive sculling it is reasonable to expect that it will take three seasons to start having consistent performances. Patience is a requirement. The peaks and valleys of your learning curve are normal. Although you may want to win right away, an internal focus on self-improvement will translate into greater external results in both the short and medium term.
Here are some suggestions to help you stay on track as you pursue your career in the single shell.
Fitness forms the base of the pyramid to build your technique and mental skills.
If your sculling technique is not at a level that you can apply power effectively you should use land exercise to get and stay fit while you are in the early learning stages. Progress towards more time in the boat but continue to supplement your sculling with cross-training until you can get a good solid workout in the single.
Technique will develop in stages and the experience of one season in the boat contributes to the next. First, establish your stability, then bladework, followed by power application, and racing skills at varied stroke rates. Consider full pressure as the best pressure you can row while maintaining good technique. Make drills a regular part of your warm-up and get as much coaching as you can during the early stages of your career by taking lessons, getting videoed or going to a camp.
Competition is where you have to synthesize the skills you have accumulated to date. A prerequisite for a good race is steering. Learn to steer. Concentrate on one stroke at a time and aim for efficiency each stroke rather than watching your split. After your event, spend some time evaluating it. Write down 10 points you need to work on and 10 points that you did better than last time.
Progress may not feel linear - but remember as you learn new things you will be constantly pushing yourself to new achievements. It’s like walking up stairs, if you find you have gone a step too far and cannot sustain your pace or your technique falters, go back down one step, re-establish your technique and then try again.
Would you like to publish this article in your club newsletter or website?
Join our Masters Rowing Advocates mailing list and we will send you one article a month. Sign up on our Advocacy page.
You can copy the text on this page. Or download the PDF.
Timing the catch, how it should feel, drills to improve the catch.
01:30 This Past Week - what we do to advocate for masters rowing. When procedures for communication don't work out through an organisation.
Lake Safety committee - many users of the water.
09:00 The placement of the oar at the catch.
Get pressure on the blade is key to moving the boat well.
You are moving while placing. The entry is the final action of the recovery - your wheels are still turning. It's important not to stop - this causes missed water.
Minimise missed water equals minimising slip.
As the blade enters it's traveling in the same direction as the boat.
Get fully buried before putting pressure on the handle.
Read and watch the full video series on the rowing stroke cycle - 6 episodes from catch to finish.
11:30 Visualise what you want at the catch.
Describe it in words. This helps you understand.
The difference between where the bottom edge of the oar touches the water and where the blade buries is missed water.
14:00 Hands lead the recovery
The handle moves further than the seat.
15:45 Checklist for good blade placement
24:00 Advanced tip to minimise slip
Have soft hands to let the water do its work
As it is buried, maintain distance between the thumbs until you feel pressure on the blade.
27:00 Thumbs along the handle drill
Don't chicken out - keepp the motion going
30:00 Row at 3/4 slide to work on the entry.
Make your corrections here because you are on the move
Backsplash is an exaggeration drill
When timing is good the splash is small
A small v-shaped splash front and back of the blade is desirable.
36:00 Row circles with one oar or in a pair. Create a controlled environment for learning.
Join our community and get our exclusive Faster Masters Rowing Magazine, packed with tips, techniques, and inspiring stories. Includes four new articles monthly.