The anger caused by a gap between expectation and reality. This episode is for intermediate rowers who are learning how to race. How to turn your anger into something useful.
Timestamps
00:45 What happens if a race outcome isn't the result you hoped for?
Should you suppress the anger, spiral into it, or neither?
Anger is expectation minus reality. The bigger the gap, the bigger your anger. Name your gap not the "failure". It's an outcome not a judgement on you, the athlete. Intermediate rowers are learning how to train first, and now you are learning how to race. This is the same process.
You've done enough training to have expectations of success but you haven't yet done enough racing to get the outcome you desire. Experienced racers expect this gap. Make the gap concrete - a time, a distance behind the winner. Name the gap and move it from being an identity problem to being a performance problem.
Notice what you say..... "I worked hard but the crew fell apart". Name it in numbers not feelings and emotions.
Less "but" and more "and".
Your post-race debrief language will have used the word but. This cancels everything which went before it such as your training investment. And allows you to hold two truths at once. I trained hard and I had a bad race. Neither cancels the other out. You accept the outcome and your next race is still ahead. As masters there's always another age group or challenge to move into.
You're going to take one thing from your toolbox of skills, mental strength, fitness and change it. Changing everything resets expectation and creates another gap. You can only test the effect of what you've changed if you change only one thing at a time.
Ask yourself - what's one thing I already know how to do better, but I didn't do today? Your answer is already there, in your toolbox. Use the "and" mindset as you think about this. I
You are learning how to do this and pattern recognition is an important part of this learning. Experiencing different situations will teach you if what you have in your toolbox is sufficient to help you close the anger gap. Training alongside another crew can help you experience more race-like situations.
Go to your crew mates and coach and find out what their gap was and discuss what you're going to do about it next time.
Knee pain in rowing typically stems from over-compression at the catch (knees past toes, excessive slide length), improper foot stretcher position, weak supporting musculature, or rapid volume increases. Fix by reducing compression 2-3cm, adjusting foot stretcher position, strengthening quads and glutes, and addressing any training load errors. Most knee pain is preventable and fixable without stopping rowing entirely.
What's happening: You're sliding so far forward that your knees track well past your toes, creating extreme knee flexion angles under load.
The problem: This position puts your knees at a biomechanical disadvantage. You're asking them to produce power from a position where the joint is maximally stressed.
The force issue: Every stroke creates hundreds of pounds of force through your knee joint. Multiply by 10,000 strokes per week at extreme flexion, and you get pain, inflammation, and potential injury.
Visual check: At the catch position, look down at your knees. If they're significantly past your toes, or if your shins angle back toward the stern, you're over-compressed.
Why masters athletes do this:

The hidden culprit: Your foot stretcher settings might be creating the over-compression problem.
Too low: Enables over-compression if you have good joint mobility.
The solution is often simple: Move foot stretcher height one hole higher (reduces compression by 2-3cm). Create a "reminder" for yourself by putting electrical tape on the slides - you will feel it when your seat wheels slide over it and that will remind you to stop sliding beyond that point. When on the rowing machine, you can wrap an elastic bungee around the slide or use electrical tape as in the boat. It's very obvious when your wheels go over the tape.
Test: Get photographed from the side while rowing and see where your knees are relative to your toes at the catch.
The mechanism: Rowing requires strong, resilient leg muscles to absorb and produce force. Weak quads and glutes force your knees to compensate.
Age factor: After 40, you lose 3-5% muscle mass per decade without resistance training. Weaker legs mean more stress on joint structures.
The vicious cycle:
Breaking the cycle: Add dedicated quad and glute strengthening (more on this below).
Too much, too soon: Rapidly increasing training volume stresses tendons and joint structures faster than they can adapt.
The 10% rule violation: Increasing weekly volume by more than 10% creates overload that manifests as knee pain.
Example of too-fast progression:
Proper progression:
The problem: If you're opening your back before your legs finish driving, you're not fully utilising leg power. This can lead to pushing harder with legs to compensate, creating knee stress.
Check: If your lower back fatigues before your legs during hard pieces, your sequencing is wrong.
The fix: Master legs-then-back sequencing. There are skills drills which your coach can teach you (or check out our Rowing Drills videos).
What are the most common technique mistakes in masters rowing?
Action: Cut your slide length by 2-3cm until your shins are vertical at the catch.
How to measure:
Mental shift required: Accept that you're trading marginal power (last 2-3cm contributes minimal drive) for healthy knees that let you train consistently for years.
Reality: Most masters athletes over-compress. Reducing compression usually improves technique and reduces pain with minimal power loss.
Position test:
Effect: Moving shoe heel height effectively changes your compression without changing your movement pattern.
Week 1-2 of pain:
If improving after 2 weeks:
If not improving:
Bulgarian Split Squats:
Step-Ups:
Terminal Knee Extensions:
Romanian Deadlifts:
Glute Bridges:
Single-Leg Deadlifts:
Hip Flexor Stretches:
Quad Stretches:
Ankle Mobility:
Weeks 1-2:
Weeks 3-4:
Weeks 5+:
If rowing is too painful:
Goal: Maintain fitness while allowing knees to recover.
If you can row with modifications:
Arms and body only rowing:
Foot stretcher position: As flexibility changes with age, your optimal settings change. Reassess regularly.
Heel height: Make sure heel cup of your shoe relative to your seat top height is suitable for your flexibility. For men it's 17 cm plus; for women 15 cm plus depending on individual ankle mobility.
Compression distance: Mark optimal catch position, check you're not sliding past it when fatigued.
This isn't rehab, it's maintenance. After 40, resistance training is non-negotiable for injury prevention.
Minimum: 2 sessions per week, 45 minutes, focusing on legs and posterior chain.
Is it worth doing strength training for rowing at age 50+?
Follow the 10% rule: Never increase weekly training volume by more than 10%.
Deload weeks: Every 4th week, reduce volume by 30-40% to allow accumulated stress to resolve.
Monitor: Track weekly volume. If knee pain appears, first check if volume increased too rapidly.
Monthly video analysis: Check that compression hasn't crept back, sequencing is still correct, positions are maintained.
Drill work: Daily technique drills maintain proper patterns even under fatigue.
Catch position checks: Every few weeks, have someone confirm your catch position. Make sure you're not sliding past it.
Don't self-diagnose serious issues. Meniscus tears, cartilage damage, and ligament problems require professional assessment.
Cost: £60-100 per session, typically need 3-6 sessions.
ROI: Prevents chronic issues that could end your rowing career.
Our Technical Masterclass includes:
Our Masters Performance Programme provides:
Join our newsletter for injury prevention strategies and training insights.
The role your head plays in correct posture and form. What happens when your head moves away from your work and why your body will always follow where your eyes are looking.
Timestamps
Normally a neutral head and neutral spine is desirable in rowing and sculling. Your head should be square above your spine and shoulders. If you drop your chin down it collapses your chest and affects the curve of your back. Moving your head from side to side changes the alignment of your eyes. Your head weighs about 15lbs (7-8kg).
If you move your head it tends to cause the finish to wash out. When you pull the handle to the finish your rib height changes and gives an inaccurate perception of where your finish height should be. In sweep it's common to see people leaning away from their rigger - away from the work. This lean affects the balance of the boat. If you lean your head it also blocks your torso rotation and affects how your shoulders line up and you lose length at the catch because you can't move around the arc successfully.
First, know when you are upright. Where your eyes are looking (leading) your body will follow. Walk in a crowded street and turn your eyes to look sideways and you will tend to walk in that direction. Try it!
Use your eyes as a way to get your body to do something. In sweep we want a rotation - if you look out to your side of the boat and look over the shoulder of the person in front of you. As you eyes go out your shoulders will tend to follow which helps guide the torso rotation. Shoulders stay parallel to your oar handle.
If you use a stroke coach mounted at your feet you look down and will find that this rounds your shoulders and changes your posture. Crews using strain gauges have the display mounted on the rigger so the athlete turns their head out in that direction to compensate.
At the finish your eyes need to be level - have a horizon to look at. Imagine you have a laser pointing out of the back of your head - imagine this staying parallel to the water - if you drop or lift your chin the laser line moves. Keep your head moving in line with your spine is the goal.
Try putting your eyes into 'soft focus' almost blurring your vision into a single point on the back of the person in front of you. Let that point be your reference and gives you awareness of movement in your peripheral vision too. This helped me to stay in time with stroke to check the distance between my eyes and her back didn't change when she moved or when she swung her body.
13:00 Coaching your head has impact in many parts of the rowing stroke - use it to guide yourself.
Listen to the episode
Tapering is reducing volume while maintaining intensity. Deloading is drop volume and intensity. Remember form = fitness minus fatigue.
Timestamps
Three ideas for your race preparation
When you ease off training do you feel flat and slow in the boat? A taper is pre-competition where you reduce volume but increase the intensity of your workouts. The conclusion is to arrive at the race feeling fresh and you haven't lost your sharpness. A deload is a recovery strategy where you reduce both volume and intensity. This lets your body get more rest during a hard training block. They feel similar but the effect is different.
Fitness rises lowly and fades slowly - notice this if you have time off. You can come back to the level of fitness you had before the break quickly.
Fatigue is the acute training load which is on top of your fitness.
Form is what's left when we clear out the fatigue - the fitness available to you on race day.
As masters our fatigue can be amplified as it takes us longer to recover. A taper keeps your fitness steady and rapidly drops your fatigue - think of your fitness as a glass of water and the fatigue is a layer of mud sitting on the top surface of the water. Clear away the mud and you can access your fitness reserves.
All Faster Masters Rowing training programs include tapers for the major masters rowing races and months of the year. Most masters only peak with a taper twice a year - a long distance race and a sprint 1k race. In the taper we cut volume by 40-50% across the taper period. Shorter sessions but nearly every session has elements at or above race pace e.g. racing starts practice.
Do not add in anything new in a taper week - no new equipment, drills or nutrition changes. The urge to train more during the taper because you feel flat during the mid-taper. This urge is nearly always wrong and you'll feel flat in days 2-4 as your fatigue is clearing. Remember you aren't losing fitness.
For multi-day regattas start the taper one week before your first race. Review your race week training and plan how you are going to manage your fatigue. Your taper is a way on collecting on what you've already earned in your training.
Review our racing programs
Dr Malcolm Howard, Canadian eight Beijing 2008 “People say it was always so easy for you, so straightforward. But it’s always been about the work. Rowing, by its nature, is a beautiful sport because you get out of it exactly what you put in. The harder I worked at rowing the more success I had.”
Timestamps
00:45 Why your brain is working against you
Many masters rowers are putting in less than they think believing in a ceiling which is not real. And limited by a brain that pulls the 'alarm cord' long before you've reached your limit.
Are you paying what rowing actually costs? This is a way of measuring work and exposes pretend work. If you train by feel (Rate of Perceived Effort RPE) but feel and reality diverge with age. RPE rises as recovery slows. When you bring tiredness into training sessions your RPE can be higher even if your work output is lower.
The three columns - What you planned to do this workout, what you actually did, honest quality rating (1-5 range). Average the scores at the end of each week. Map the gap between what you intended and your execution. Write it down and bring honesty to your training.
Some masters may be leaving more on the table than you think. A limiting belief is that your effort is limited by age. This kicks in before your actual physical limit occurs - mind working separately from the body. Test yourself by picking one thing on your training plan that you dislike and so avoid doing. Am I avoiding this because my body can't do it or because I don't want to find out what it reveals about me? Masters have more choice and may take more recovery between workouts than pro athletes. Do that one session which you've been avoiding next week and notice if the ceiling is your body or your mind.
The science behind your brain limiting you in an effort to protect you. Your brain lies in order to protect you - so renegotiate with your brain. Brains are survival machines and send a STOP signal before you reach your actual limit. It's conserving resources and energy reserves in case you need it. The Central Governor Theory by Tim Noakes - brain limiting your output based on predicted cost not actual capacity. When you expose your body once to a hard effort - your brain re-anchors what hard feels like. Next time you do it the alarm goes off later. Perceived difficulty and the urge to stop reduces on the second exposure to the same stimulus. The brain's prediction model adapts. This is the physiological underpinning of Malcolm Howard's quote. The work doesn't just build the engine, it teaches the brain what your engine can do. Faster Masters Rowing training programs include workout repeats in order to help you use the repeated bout effect in your training.
The ledger shows what you're actually putting in; the ceiling test shows what's still available; the repeated bout effect shows why doing it once is enough to retrain your brain.
Listen to audio version
Why do so many masters rowers struggle with catch timing despite endless practice? Al Morrow's counterintuitive principle. The causes and cures of rigidity in your body and the amazing catch timing waiting for you (when you cure it).
Timestamps
Al Morrow's remark when talking about Good Rowing is Horizontal - the issue that rigidity kills how you approach the catch. "The more rigid you are, the lower the probability you will have a good catch." Al Morrow Feeling you are in control in rowing can lead to tension, particularly in your hands. There's a balance between having control and being so tight that you do not have good control. Controlled, accurate movements are your goal. Test this for yourself by gripping your handle tighter than usual and note how your catch timing and depth is or your feather/square movement. Poise is a balance between the right amount of control and tension to facilitate the rowing movement, Enough tension to get into the right positions but not so much that you are rigid and hamper your strength, movement and oar control. Rigidity kills your strength. 90% of your power in rowing is below your arm pits. When rigid it's hard to respond in real time to a gust of wind, balance issues or wake. When relaxed, the boat absorbs the energy from the wind or waves and you don't react to the disruption.
This is a catch drill - put the oar in the water fast so it arrives at the perfect depth under the surface. From the catch position, push down on the handles so the oar spoon is high above the water. Let go of the handles quickly and listen to the sound the oar makes as it enters the water. An oar arriving in the water under zero tension - you will see it arrive at the perfect depth. The perfect depth happens when you are relaxed and do not interrupt gravity. Progress the drill by gradually holding the handle without tension - fingers extended. Make the same sound. Move to holding a normal grip while keeping the same blade entry sound. Then take one stroke. Stop rowing and try it again. Move towards making the perfect catch sound but starting at the finish - roll up the recovery and unweight the handle to place the oar in the water. Work on the timing of unweighting your hands and the slide change of direction. The hand action has to precede the slide stopping. Remove rigidity from your neck shoulders, arms and hands at the catch using this drill.
The best possible catch at higher stroke rates comes from being proactive placing the catch - that can negate the lack of rigidity you've been working on.
Build trust that you won't flip when unweighting the handle. Move the moment when you release the tension to being earlier in the recovery. Listen to the sound of the blade entry.
Listen on Soundcloud
The risks of abrupt changes of your training and surprising outcomes from practice lineups, rigging, and winter to summer transitions with guest Marlene Royle.
Timestamps
Marlene sees these as a red flag for masters rowers. Her experience as a coach when racing season comes around was a trend from mid-summer on where their season got derailed. All were caused by quick changes, unfamiliar boats and doing a training session from another coach on top of their normal training. These are all avoidable.
Let your muscles and tendons adapt to different stresses like moving from an indoor rower to a boat. The difference between a sculling erg and a sweep boat is clear in movement patterns. All these abrupt changes resulted in injury to tendons or muscle strain. Rule of thumb for moving onto the water is to start at 50% volume in week one and build up to full training in the new mode over 4 weeks. You won't get as fit on the water initially as you did on the rowing machine so use this time for technique.
The temptation is to stop rowing your normal pattern and instead to "flex" and go with what you feel in the boat. This is an abrupt change in technique and not conducive to protecting your body. If you have a sensitive low back, then an unstable boat can cause a flare up. Common sense - think before you do. Common sense is not very common. For equipment make gradual changes.
Listen to podcast
Want easy live streams like this? Instant broadcasts to Facebook, YouTube, LinkedIn. Faster Masters uses StreamYard: https://streamyard.com/pal/d/5694205242376192
Hire a coach if: you're serious about competitive improvement, you struggle with self-programming or accountability, your technique needs professional assessment, or you have plateaued despite consistent training. The ROI is highest when you're willing to implement feedback and train 4+ times weekly. Expect to invest $150-400/month for quality masters-specific coaching.
1. You're serious about competitive performance
2. You lack programming knowledge
3. Technique needs assessment
4. Accountability matters
5. You're returning after time off
Masters-Specific Experience:
Technical Expertise:
Programming Knowledge:
Communication Style:
❌ One-sise-fits-all programming: Same workouts for everyone regardless of age/ability
❌ No masters experience: Only coached juniors or collegiate athletes
❌ Poor communication: Takes days to respond, doesn't explain decisions
❌ Volume-obsessed: Thinks more training is always better
❌ Ignores injury/pain: Tells you to "push through" instead of addressing root cause
❌ No credentials: Can't articulate coaching philosophy or methodology
What you get:
Cost: $200-500/month
Best for: Serious competitive athletes, those with specific needs/injuries, athletes who value personal attention
What you get:
Cost: $100-250/month
Best for: Self-directed athletes who want structure and community, budget-conscious athletes, those who train well in groups
What you get:
Cost: $75-200/month
Best for: Disciplined self-starters, those without local masters coaching, athletes with consistent schedules
What you get:
Cost: $50-150 per session
Best for: Experienced athletes who mostly self-coach, technique check-ins, second opinions
Faster improvement:
Injury prevention:
Race performance:
Time efficiency:
You won't see ROI if:
Coaching amplifies effort, it doesn't replace it.
Use pre-made programmes:
Self-educate:
Video self-analysis:
Training partners:
Periodic check-ins:
Many coaches offer:
Use this to evaluate:
Commit for at least 3 months:
Evaluate after 3 months:
Then decide: Continue, adjust, or move on.
If you have in-person coaching and want masters appropriate professional-quality programming, our Masters Performance programme provides:
Get structured, age-appropriate training at a fraction of coaching costs.
Join our newsletter for free weekly training insights and coaching tips.
Ways to adjust your stroke to match the boat hull speed. Ways to move so efficiently that your body mass moves with the boat speed and improves your maximum boat velocity in rowing and sculling
Timestamps
00:45 The boat velocity changes through the rowing stroke cycle and you can feel these changes as you row.
This is a measure of the difference between a skilful crew and less experienced athletes. When watching crews in a race you can see some crews just inch ahead of the others. Efficiency is a key to why the best crews do well - they use their power efficiently; they help the boat hull to move through the water with greater efficiency - how do they do this? They manage their body mass well.
Body mass is resistance to changes in velocity.
This matters because the entire boat is moving forwards all the time (even though you may think you go backwards and forwards on the slide). Because of the sliding seat, the boat hull doesn't travel level, the bow moves up and down through the stroke cycle.
Diagram of boat speed through the water
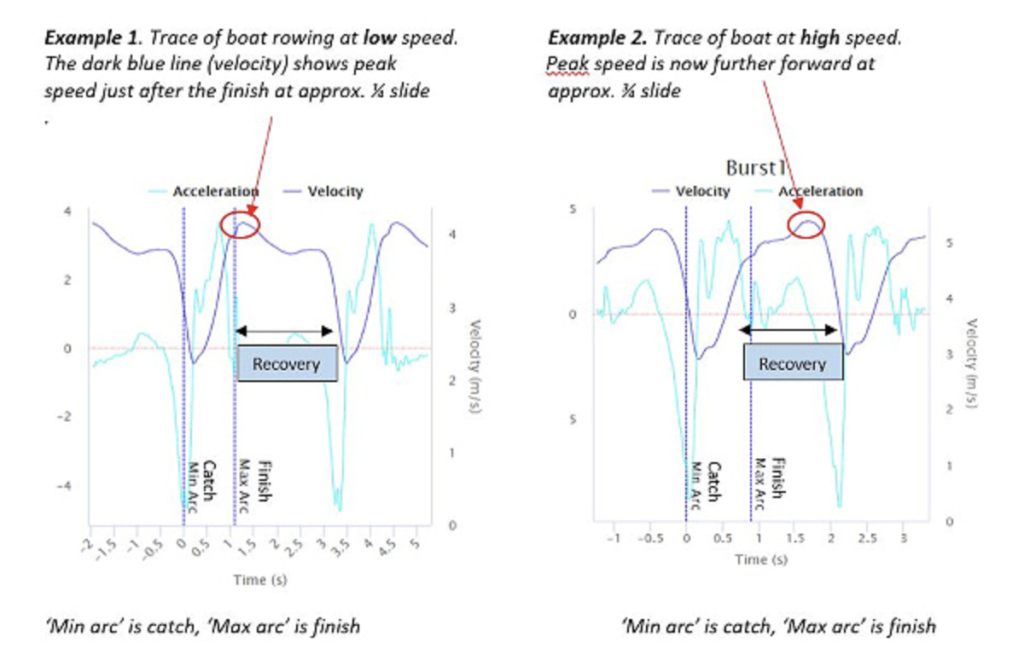
Maximum boat speed DOES NOT happen in the power phase. The point of maximum velocity is after the oars have come out of the water. [NOTE: not maximum acceleration as said in the video.] At this point you are transitioning onto the recovery (arms away / body rock forwards).
On a video filmed square off 90 degrees to the rowing boat - when the bow ball is at its highest point is when the athletes have moved closest to the stern (on the recovery) and the point of maximum acceleration is when the bow ball is lower and when the athlete is transitioning from the power phase onto the recovery phase.
The diagram shows the boat at low and high rates (right hand side). At higher rates the point of maximum acceleration is nearer to the catch on the recovery. The boat moves differently at high stroke rates from low stroke rates. Understanding and noticing the boat acceleration feeling and how your body moves are two things you can control. If you can learn how to feel the boat movements you can make refined adjustments to how you are rowing at race pace compared to steady lower rates.
We get good at efficiency at low rates because rowers do a lot of endurance training. Yet athletes who race want the effect of efficiency at race rates. Can we improve our agility and how we are moving with the hull and practice in training?
Periodised training plans do not include a lot of high rate work. What we can do to keep the boat skills of handling the oars and body mass at low and high rates?
These are key to learning the skills. Ways to move quickly and keep the handle speed in time with the boat. These can be spliced into endurance rows for short periods of time. This doesn't upset the physiological training effect. Try doing agility drills for 1 minute in every 10 minutes low rate rowing.
Get easy live streams like this https://streamyard.com/pal/c/5694205242376192
Hear Becky Wilson for an in-depth review of the considerations for the masters athlete in terms of cardiac health.
In this episode you will learn
The questions answered during the presentation


Join our community and get our exclusive Faster Masters Rowing Magazine, packed with tips, techniques, and inspiring stories. Includes four new articles monthly.