The role your head plays in correct posture and form. What happens when your head moves away from your work and why your body will always follow where your eyes are looking.
Timestamps
Normally a neutral head and neutral spine is desirable in rowing and sculling. Your head should be square above your spine and shoulders. If you drop your chin down it collapses your chest and affects the curve of your back. Moving your head from side to side changes the alignment of your eyes. Your head weighs about 15lbs (7-8kg).
If you move your head it tends to cause the finish to wash out. When you pull the handle to the finish your rib height changes and gives an inaccurate perception of where your finish height should be. In sweep it's common to see people leaning away from their rigger - away from the work. This lean affects the balance of the boat. If you lean your head it also blocks your torso rotation and affects how your shoulders line up and you lose length at the catch because you can't move around the arc successfully.
First, know when you are upright. Where your eyes are looking (leading) your body will follow. Walk in a crowded street and turn your eyes to look sideways and you will tend to walk in that direction. Try it!
Use your eyes as a way to get your body to do something. In sweep we want a rotation - if you look out to your side of the boat and look over the shoulder of the person in front of you. As you eyes go out your shoulders will tend to follow which helps guide the torso rotation. Shoulders stay parallel to your oar handle.
If you use a stroke coach mounted at your feet you look down and will find that this rounds your shoulders and changes your posture. Crews using strain gauges have the display mounted on the rigger so the athlete turns their head out in that direction to compensate.
At the finish your eyes need to be level - have a horizon to look at. Imagine you have a laser pointing out of the back of your head - imagine this staying parallel to the water - if you drop or lift your chin the laser line moves. Keep your head moving in line with your spine is the goal.
Try putting your eyes into 'soft focus' almost blurring your vision into a single point on the back of the person in front of you. Let that point be your reference and gives you awareness of movement in your peripheral vision too. This helped me to stay in time with stroke to check the distance between my eyes and her back didn't change when she moved or when she swung her body.
13:00 Coaching your head has impact in many parts of the rowing stroke - use it to guide yourself.
Listen to the episode
The most experienced rowers aren't thinking about every movement: they are hitting three key checkpoints only. The finish, quarter slide and three quarter slide.
Timestamps
The finish is the only point where the boat, the blades and your body are all travelling in the same direction (the direction the boat is moving in). This gives the finish a stillness where you can be relaxed and sit still - the work is done. You should feel balanced and symmetrical with a low centre of gravity. This is the most stable part of the stroke.
Your posture contributes to the stillness - an open chest posture. As your hands move away the finish is over and your mass starts to move up the slide towards the stern (opposite direction to the hull movement).
You feel incontrol of time - if you feel rushed in the recovery use this point at the finish to reset.
Recommended drill - single strokes to the finish. Leave your handle(s) next to the body, feathered.
Here you have the body set in the catch angle - this is so you can begin to feel the boat moving under you. Recover your body mass and start it moving towards the stern.
Your handle continues past your knees at this point - as a consequence this draws your shoulders forward and your trunk rocks naturally. You are nearly in the catch position (except for your leg compression). If you don't get your handle past your knees you tend to row upright and don't get the trunk movement and you rock late in the recovery which disrupts the boat. If you lift your handle too early later on you have to push it down to give room to square - another disruptionIn sweep at quarter slide your nose, chin and sternum line up with your inside knee.
Recommended drill - row pausing at quarter slide checking you get into the right position at the pause.
This is the 'danger zone' where hull speed gets lost. Your mass is 5-7 times the mass of the boat hull. If you are sliding faster than the hull your mass works against the boat. Going fast up the recovery slows your boat.
Imagine doing a squat jump - if you descend too fast and drop your weight to the floor makes you feel heavier on the floor making it harder to jump up again. This is similar to rushing the slide.
Things to check at 3/4 slide - is your handle height low enough for you to square if needed? Is your upper body relaxed with minimal pressure on the footstretcher? Feel the boat is free under your feet.
Test this by rowing at 3/4 slide and then return to full slide. If your boat speed is the same at 3/4 and at full slide it's a sign you could be more effective at 3/4 slide.
Your centre of mass needs to be low in the boat, your torso should not be braced - it's in the same posture as at quarter slide.
Recommended drill - shadow rowing drill. Row the recovery without holding the oars. Try shutting your eyes. Call out each position as you go through it - finish, quarter slide, three quarter slide. Naming the point helps.
Summary
The finish resets you and gives you time, the quarter slide sets your body before the boat begins to move and three quarter slide is where you preserve or lose hull speed. When you get tired or under pressure that's the moment to focus back into these three points.
Watch on YouTube
Listen on SoundCloud
Ways to adjust your stroke to match the boat hull speed. Ways to move so efficiently that your body mass moves with the boat speed and improves your maximum boat velocity in rowing and sculling
Timestamps
00:45 The boat velocity changes through the rowing stroke cycle and you can feel these changes as you row.
This is a measure of the difference between a skilful crew and less experienced athletes. When watching crews in a race you can see some crews just inch ahead of the others. Efficiency is a key to why the best crews do well - they use their power efficiently; they help the boat hull to move through the water with greater efficiency - how do they do this? They manage their body mass well.
Body mass is resistance to changes in velocity.
This matters because the entire boat is moving forwards all the time (even though you may think you go backwards and forwards on the slide). Because of the sliding seat, the boat hull doesn't travel level, the bow moves up and down through the stroke cycle.
Diagram of boat speed through the water
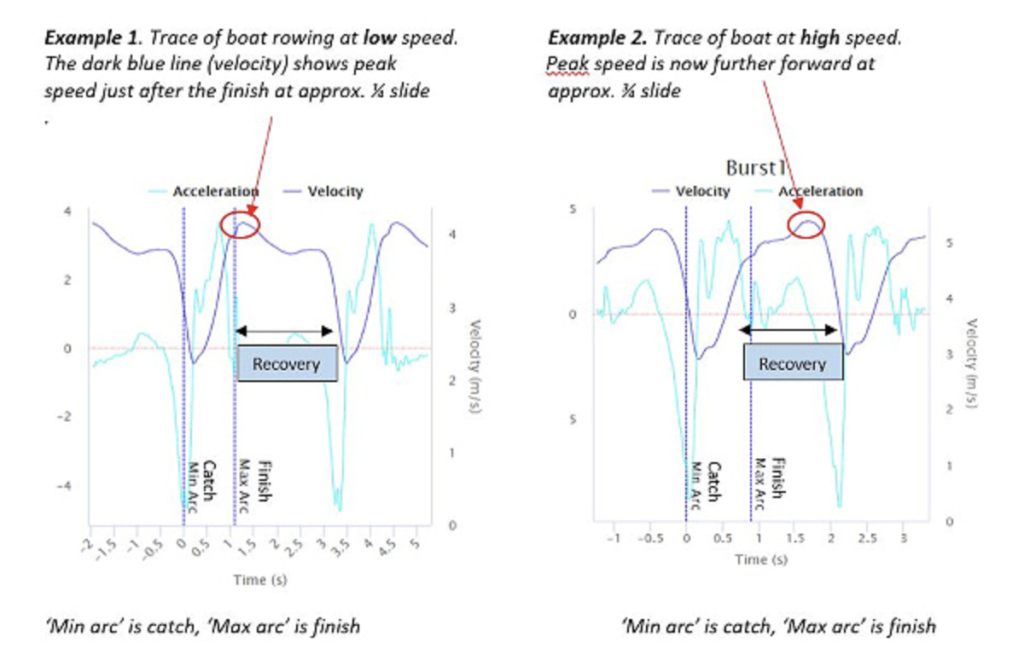
Maximum boat speed DOES NOT happen in the power phase. The point of maximum velocity is after the oars have come out of the water. [NOTE: not maximum acceleration as said in the video.] At this point you are transitioning onto the recovery (arms away / body rock forwards).
On a video filmed square off 90 degrees to the rowing boat - when the bow ball is at its highest point is when the athletes have moved closest to the stern (on the recovery) and the point of maximum acceleration is when the bow ball is lower and when the athlete is transitioning from the power phase onto the recovery phase.
The diagram shows the boat at low and high rates (right hand side). At higher rates the point of maximum acceleration is nearer to the catch on the recovery. The boat moves differently at high stroke rates from low stroke rates. Understanding and noticing the boat acceleration feeling and how your body moves are two things you can control. If you can learn how to feel the boat movements you can make refined adjustments to how you are rowing at race pace compared to steady lower rates.
We get good at efficiency at low rates because rowers do a lot of endurance training. Yet athletes who race want the effect of efficiency at race rates. Can we improve our agility and how we are moving with the hull and practice in training?
Periodised training plans do not include a lot of high rate work. What we can do to keep the boat skills of handling the oars and body mass at low and high rates?
These are key to learning the skills. Ways to move quickly and keep the handle speed in time with the boat. These can be spliced into endurance rows for short periods of time. This doesn't upset the physiological training effect. Try doing agility drills for 1 minute in every 10 minutes low rate rowing.
Get easy live streams like this https://streamyard.com/pal/c/5694205242376192
A visual reference to aide adjustments to blade depth.
Timestamps
00:45 Low technology solutions for rowing too deep.
The tape goes around the oar shaft so that when the oar is under the water at the correct depth and the handle is at the correct height for you to old. Mark exactly where the shaft is level with the water surface. You can do this where the oar shaft is wet if you do this carefully. Measure the spot, return the oars to land and transfer that measurement to all the other oars and put white tape on them too. While rowing you can look sideways at your oar to see if the white tape is going under the water and where in the stroke it goes too deep (and you can no longer see the tape).
Usually it's caused by the athlete holding the handle too high. Modern oar designs naturally sit at the correct depth. If you row 'over the barrel' the path of the handle is too high mid-stroke (and usually too low at the finish so your oar spoon washes out). The water is flat and so the path of the handle in the power phase should also be flat. At the catch if you take the catch by lifting your shoulders it can also cause the oar to go too deep. Tension in the hand grip also can cause the oar to go too deep. In sweep this is often the inside hand holding on too tightly.
- Backing down into the catch. Push the oars from the finish backing down and then leave the oar in the water and take the stroke. Go backwards and forwards gradually lengthening from half slide to full slide. This helps you to work out the correct handle height.
- Row in circles. One person row in sweep and look out at your oar as you row so you can see the depth. In sculling just row with one oar and get a friend to hold the boat steady.
- Half blade depth rowing. Row with only half the oar under the water - feel the depth by controlling the handle precisely with very small movements.
- The amount of power you put on can affect blade depth. So try alternating light and firm pressure strokes to help you work out depth.
There's a marketing phrase that's been floating around lately: "Nobody buys a single scull - they buy how a single scull makes them feel."
At first, it sounds like the kind of thing a consultant would say. But sit with it for a moment, maybe while you're having your morning coffee or watching the river from the dock. Think about that boat you've been eyeing, or the one gathering dust in your garage, or the one you sold years ago that you still remember. Were you ever really buying carbon fiber and riggers? Or were you buying something else entirely, those silent pre-dawn rows when the water mirrors the sky, that feeling of the catch when everything locks in just right, the sense that out there, gliding across the river knowing you're exactly where you're meant to be?

We've reached an age where we've accumulated enough life to know what truly matters, and perhaps that makes this question more interesting rather than less. The boats we choose now aren't about training for the next race or impressing the club. They're about what draws us back to the water season after season, what keeps us sliding the boat off the rack on cold mornings when we could just as easily stay warm inside. Maybe it's the rhythm that quiets a busy mind. Maybe it's the communion with dawn and mist and current. Maybe it's simply that rare feeling of mastery, not over the water, but moving with it, that comes harder and means more with each passing year.

Next time you find yourself running your hand along a gunwale or scrolling through boat classifieds you don't strictly need to be looking at, you might ask yourself what you're really shopping for. It's not a trick question with a right answer. The single scull, after all, is perhaps the most honest boat there is. Just you, the blades, and the water. What it offers isn't in the specifications sheet. It's in those moments when the boat seems to disappear beneath you, when your breath matches your stroke, when you round the bend and surprise a heron in the shallows and both of you pause, suspended in the same quiet moment. That's not a feature anyone can engineer. But it might be exactly what you're buying.
With any endeavour, there is a progressive of acquisition of skill and I like to think of this as a ladder of learning - you start on the bottom rung and work your way up.
This metaphor is helpful for coaches as well as athletes. Because if you can work out where you are, it becomes clear where the next step is and the next skill you need to acquire. This makes coaching lesson plans easy - it's obvious what to teach next and this applies to self-coaching as well.
You can work out for yourself where your rowing and sculling skills are using our Rowing Skills Checklists. There are 3 - Beginner, Intermediate and Advanced.
Within each are groups of skills around
Each checklist sets out things which you should be able to do if you are moving towards that skill level. The beginner level includes turning the boat and being able to follow your local navigation pattern; intermediates should be able to row or scull with the oars not touching the water on the recovery and having experience in small and big boats.
These are flexible checklists - you don't have to do every beginner skill before you start attacking the intermediate ones. In my experience as a coach, most athletes have to master the basics before advancing.
Use these lists for your club by adding in your local navigation rules, information about other water users (e.g. if you are on salt water or a tidal river) and local "conventions" in navigation. Some clubs use these to test skill before an athlete can move into a training group or take a single out unaccompanied.
Do a quick self-assessment and decide whether you are mostly a beginner, an intermediate or an advanced rower. Understand this by reading all the skills and marking any which you can do (or have done more than twice).
Take this list to your coach and ask them to teach you the skills to fill in the gaps in your knowledge.
In this way you can be pro-active about your rowing development with the goal of becoming a well-rounded athlete and a strong team member.
Join the Masters Rowing newsletter where >15,000 masters rowers have signed up to get weekly updates, tips, advice, and discussions to share with your rowing friends.
Three ways to get faster (or avoid slowing down) in training.
Timestamps
00:45 Can you increase the average speed of your boat? The net of how fast it accelerates in the power phase and how much it slows in the recovery phase.
Our past episode about how to get speed on the recovery https://youtube.com/live/RRF3o7LxNXM
Pay attention to the water surface, to the wind and waves, to the water swirls under a bridge. This allows you to make subtle changes to how your boat is moving. Rowing in a headwind - at the start the waves are highest (they've progressively built up) and these lower as you get closer to the end of 1k. With large waves you cannot rate high. When rowing to the conditions as you notice the wave height reducing, push on and increase the rate by half a point. You can also change the ratio (intensity through the water compared to relaxation up the slide).
If you do a big push the chances are you will suffer a large fall off in boat speed after the push is done. Choose moderate moves and you are more likely to be able to hold the new boat speed after it ends. Make your moves sustainable longer. Pushing hard means you may compensate by trying to save energy and your pace judgement may suffer.
The puddles of the crew in front are disturbed water. When the water block is churned by someone else's oar it makes the water unstable and hard for you to get your oar to grip the water. This affects the boat run and your ability to put energy into pushing the boat forwards.
When rowing near other crews, put their puddles under your riggers - between the hull and your spoon. The disturbed water will neither affect the run of your hull nor your spoon grip on the water. Rowing in dirty water is hard to avoid if your eight has an unconventional rig (two people on the same side in sweep eights) this may result in bow and stroke being on the same side. Only the fastest mens eights can avoid stroke rowing into bow's previous puddle.
Want live streams like this? https://streamyard.com/pal/c/5694205242376192
Learn steps towards getting a good catch using drills.
Timestamps
00:45 Am I done learning the stroke yet? Asked an athlete.... only once!
The catch is challenging to learn - supporting your learning with drills means you can self-coach as well as getting coached.
Michael sends his crews the drills video the night before practice. Athletes need to know what to do in a drill and (importantly) why they are doing this drill. There are two main types of drill - exaggeration drills and isolation drills.
This is where learning the catch starts - the height of the handle has to be understood so you know how high/low the handle needs to be. Describe the stroke cycle in high/low handle heights including the "ramp up" towards the catch position. Learn this stationary in the boat. When the oars are flat on the water at the catch, the handle height is the same as when the oars are squared. Teaching how to arrive at this height the drill is "Slap Catches" so the athlete knows the precise moment their handle reaches the correct catch height - and the aural sound helps to align timing on both sides of the boat. Learn when to go up "the ramp".
You have to actively lift your hands to make the catch 'shape' with the handle. Learning when and how to do this is the next stage in progressive learning. After squaring the blade, if you make the catch shape too early, the oar hits the water.
If you square and your handle is too high on the recovery the oar will hit the water. An early square helps and you can figure out how high (low) the handle needs to be on the recovery so as to not hit the water. When to make the shape? Use the second drill - backsplash drill - so the lower edge of the oar hits the water just as the handle lifts. You can hear and feel the backsplash.
This is relative to your body movement and the seat. Your seat is a good proxy for body movement because there's a short moment when the seat rolls forward and stops as it changes direction. That's when you need the oar to already be under the water. The third drill (sweep) is to row with inside hand holding the back of the seat so you can tell when it changes direction. In sculling row with one oar only (someone holds the boat level). Watch the height of your knees too as this is also a good visual marker.
Our discussion continued around ways to keep handle moving towards the stern while placing the oar at the catch. This series can be learned in a few practice - do two each time you go on the water. Take care that you understand the why as well as the how.
Want easy live streams like this? Instant broadcasts to Facebook, YouTube, LinkedIn. Faster Masters uses StreamYard: https://streamyard.com/pal/d/5694205242376192
What you do on the recovery affects what you do on the power phase.
Timestamps
00:45 What you do on the recovery What you do as you approach the catch is likely the first thing you do on the power phase. Any errors get transitioned to the next stroke. Three common things happen - shoulder lifting, rushing the slide and the oar going too deep at the catch.
This is putting the oar in the water by lifting your shoulders to feel the oar connection to the water. To prevent this, start at the finish of the prior stroke. By getting the arms/body transition (pre-stretching) correct on the recovery you can improve your catch and remove the shoulder lift.
One of the reasons we rock forward later in the recovery is that it feels like you're getting more length. But this makes you focus on the handle so when you take the catch, you're still focused on the handle and so you pull (not push) to make connection with the water.
Goal is to connect with minimal body movement - ideally only your knee to ankle moves. compounding - reaching more at the catch slows it down because your body weight causes the stern to push down into the water and you have to lift the handle to make the placement but you're working against yourself because you're also leaning and create a greater height the handle has to move to get the spoon under the water. If you don't shoulder-lift you are more likely to be on time at the catch.
By accelerating the slide in the second half of the recovery this causes rushing. The pre-stretch gives you time on the recovery - you can work out how quickly you want to arrive at the catch. You don't need to move anything except bend your knees.
Weight on the footstretcher gives you the feeling of control of the slide speed. Check your handle speed at the finish compared to the person in front of you to ensure you are in time with them. If you row longer than anyone else (long legs) you have to slide because you're taller.
Starting to roll up the slide before completing the pre-stretch gives a false timing signal to the people behind you. Ratio is another cause of rushing especially if you're doing a one to one ratio. Insufficient power through the water causes 1:1 ratio and makes it hard to do the recovery without rushing. A lack of awareness can also cause you to rush - is your body weight on the back of the seat (your bum side not your legs side). You should feel your body weight under where your thighs join your bum on the recovery (after the rock forward). Let your hamstrings relax more on the recovery so the forward momentum of the boat pushes you up the slide (with weight on the footstretcher).
When the oar goes into the water it goes too deep initially.
Starting on the recovery, if you don't push down on the handles to get the oar spoon clear of the water before you feather you will probably carry the handles too high on the recovery. The compounding issue is that in order to square without hitting the water, you have to push your handles down. You over-do the lift and so the oar goes too deep into the water.
Pushing down to square also causes you to drop your shoulders and then when you get to the timing of the catch you lift your hands and also lift your shoulders (they're tense) and this causes you to go deep because your whole body block lifts up. The catch should only be done by the arms to lift the handle and the knee to ankle to push on the foot stretcher. Make a small upward movement on the handle to place the oar only using your arms.
So squaring late can cause you to mis-time the catch as well. If your oars go too deep - take a look at what you do at the finish and see if that causes you to mis-time the catch as a compounding technique error. Solutions come from video - three strokes of yourself from 90 degrees square off - slow it down to watch as you compare it to a model of good rowing / sculling.
See more resources below
The power phase is most effective when legs drive first and back follows yet so few masters rowers do this. Why?
Timestamps
The alignment of the womens double in the photo shows that the crew hasn't used their back while having legs nearly straight. Getting into this position requires having shoulders sternwards of the hips at the catch and to use their legs first in the power phase.
We have a lot of practice using hands and arms in daily life. We are good at this. At the catch you want to feel the oars loaded up under the water surface. If you pull with your arms you feel this earlier. By pulling with your arms and lifting the shoulders and lifting your chin you feel the workload on the spoon.
Rowing is a pushing not a pulling sport in the main. Rowing legs only is 60% of the power; back swing is 25-30% of your power and so your arms add 5-10% of your power ONLY.
The rowing stroke uses a range of body muscles from legs, thighs and calves through to arms and hands. In daily life we use small muscles a lot - they fire quickly when we use them in daily life. We are practiced using them.
The quads and glutes are slower to activate so we have to train them - we're less habituated using these. Connecting the handle of the oars through the footstretcher is unfamiliar and you have to train it.
The first activation in the power phase is the calves to push the heels down onto the footstretcher. Then the quads join in to straighten your legs. When your legs are 3/4 straight you start the glute activation - hinging to connect legs to the back. Using the glutes to sustain pressure on the footstretcher while you swing your back. If you lose pressure on the footstretcher you are no longer accelerating the boat. Your feet are the only part of your body connected to the boat. As your back starts to activate you draw with your arms.
Connecting to the footstretcher early in the power phase is our goal. If you take the catch with the arms or swinging the shoulders/back this is a problem. When delivering power through the stroke you can only use each muscle group once per stroke.
If you swing your back to take the catch you've got no back swing to use later in the power phase because you are already leaning backwards. It also prevents you from activating your leg drive - they do straighten but not as dynamically as you should. By not activating your legs this removes up to 60% of your possible total power which is a lot. And as a consequence you probably don't activate your glutes because you aren't using your legs enough.
There's a correlation between the water being slower at the catch than later in the stroke. The angle of the oar spoon is also going into the slower water at an acute angle to the side of the boat. Use the slower water speed along the slower muscles to generate that early power in the stroke.
15:00 The solution to delaying your back swing Is to train yourself to use the big muscles, learn what it feels like to activate the quads and glutes early in the stroke. Then you know what it feels like to grip the water at the catch with your feet (rather than hands or shoulders).
This is the beginning point to learn how to activate big muscles first and layer the smaller muscles on top as later activations.
Scroll down for more resources
Join our community and get our exclusive Faster Masters Rowing Magazine, packed with tips, techniques, and inspiring stories. Includes four new articles monthly.