Why do so many masters rowers struggle with catch timing despite endless practice? Al Morrow's counterintuitive principle. The causes and cures of rigidity in your body and the amazing catch timing waiting for you (when you cure it).
Timestamps
Al Morrow's remark when talking about Good Rowing is Horizontal - the issue that rigidity kills how you approach the catch. "The more rigid you are, the lower the probability you will have a good catch." Al Morrow Feeling you are in control in rowing can lead to tension, particularly in your hands. There's a balance between having control and being so tight that you do not have good control. Controlled, accurate movements are your goal. Test this for yourself by gripping your handle tighter than usual and note how your catch timing and depth is or your feather/square movement. Poise is a balance between the right amount of control and tension to facilitate the rowing movement, Enough tension to get into the right positions but not so much that you are rigid and hamper your strength, movement and oar control. Rigidity kills your strength. 90% of your power in rowing is below your arm pits. When rigid it's hard to respond in real time to a gust of wind, balance issues or wake. When relaxed, the boat absorbs the energy from the wind or waves and you don't react to the disruption.
This is a catch drill - put the oar in the water fast so it arrives at the perfect depth under the surface. From the catch position, push down on the handles so the oar spoon is high above the water. Let go of the handles quickly and listen to the sound the oar makes as it enters the water. An oar arriving in the water under zero tension - you will see it arrive at the perfect depth. The perfect depth happens when you are relaxed and do not interrupt gravity. Progress the drill by gradually holding the handle without tension - fingers extended. Make the same sound. Move to holding a normal grip while keeping the same blade entry sound. Then take one stroke. Stop rowing and try it again. Move towards making the perfect catch sound but starting at the finish - roll up the recovery and unweight the handle to place the oar in the water. Work on the timing of unweighting your hands and the slide change of direction. The hand action has to precede the slide stopping. Remove rigidity from your neck shoulders, arms and hands at the catch using this drill.
The best possible catch at higher stroke rates comes from being proactive placing the catch - that can negate the lack of rigidity you've been working on.
Build trust that you won't flip when unweighting the handle. Move the moment when you release the tension to being earlier in the recovery. Listen to the sound of the blade entry.
Listen on Soundcloud
Prevent rib stress fractures by: controlling catch entry (no aggressive "attacks"), limiting trunk rotation to 5-10 degrees maximum, using deliberate recovery pace, adding dedicated core stability work, and ramping volume slowly (max 10% per week). If you've had one rib injury, your re-injury risk is 300% higher, and so prevention becomes non-negotiable.
What happens: Rib stress fractures occur from repetitive overload on the ribcage, typically ribs 5-9, most commonly on your dominant side if you row sweep.
The mechanism: Every aggressive catch and every bit of excessive trunk rotation creates micro-stress on your ribs. Add 10,000 weekly strokes to aging connective tissue with reduced elasticity, and you get stress fractures.
Why it's worse after 40:
You're at elevated risk if you:
The problem technique: "Attacking" the catch by throwing your body weight forward or lifting your shoulders to plant the blade. This creates violent force on your ribcage.
The fix:
Practice drill:
The problem: Over-rotating at the catch (shoulders opened aggressively toward bow) creates rotational stress on ribs.
The fix:
Check yourself: Have someone video you from behind/above. At the catch your inside knee should line up with your sternum and your shins should be vertical.
Why recovery matters: A rushed, uncontrolled recovery forces you to "catch" yourself at the front end, creating the violent catch that stresses ribs.
Recovery principles:
Feel: If your recovery feels frantic or rushed, slow it down. Practice on the erg with the front leg of the rowing machine raised up on a pile of bricks. You will not be able to rush uphill and learn to control the slide.
Anti-rotation exercises:
Pallof Press:
Dead Bug with Resistance:
Side Plank:
Bird Dog:
Goal: Build the deep core stability that prevents excessive trunk movement during rowing.
Why it matters: Limited thoracic mobility forces compensation through excessive rib movement.
Thoracic rotation stretch:
Cat-cow:
Foam rolling:
Never increase weekly volume by more than 10%.
Example:
Why it matters: Rapid volume increases are the #1 cause of overuse injuries in masters athletes. Your bones and connective tissue adapt slower than your cardiovascular system.
Every 3-4 weeks, reduce volume by 30-40%.
Example schedule:
Purpose: Allows accumulated micro-stress to heal before it becomes injury.
Be extra cautious when:
If you have these symptoms: STOP rowing immediately. See a sports medicine doctor. Continuing to row through rib pain turns a minor stress reaction into a complete fracture requiring 2-3 months off.
Myth: "If I just row through it, it'll get better."
Reality: Rib stress fractures get worse with continued loading. Early intervention (stopping at first sign) means 2-3 weeks off. Ignoring it means 2-3 months off.
Immediately:
Typical timeline:
DO NOT: Try to "test" if it's healed before imaging confirmation and doctor clearance.
Week 1-2 return:
Week 3-4 return:
Week 5+ return:
Key principle: The slower you return, the lower your re-injury risk.
Calcium: 1,200-1,500 mg/day Vitamin D: 2,000-4,000 IU/day (get levels tested) Protein: 1.2-1.6 g/kg bodyweight daily Vitamin K2: Consider supplementation (works with D for bone health)
Why it matters: Adequate nutrition supports bone density and healing capacity. Deficiencies increase fracture risk significantly.
Rib injuries are preventable with proper technique and volume management. Our Technical Masterclass covers:
Don't wait until you're injured to fix your technique.
Join our newsletter for weekly injury prevention strategies and technique insights.
How to increase stroke power using three layered drills.
Timestamps
These are all part of the Drills Compendium (24 drills + 3 ebooks bundle). Masters rowers tend to row a good leg drive and arm draw but neglect the back swing. The back is crucial to joining the leg drive and arm draw. How to ensure back swing adds to the speed of the boat.
From the catch (where boat is slowest) the stroke power takes the boat to its fastest speed. After the leg drive is half completed you need to start to layer the back swing so it overlaps with the end of the leg drive. Later the arm draw overlaps with the end of the back swing. Learn how to use each body part in turn without dropping boat power at the changeover.
This is the least intuitive part! Start with legs straight and arms straight with blade in the water while leaning forwards. Swing your back to take the stroke and take the oars out when your. back swing is completed. Do this square blades and then once confident, add power to the stroke by engaging your core and glutes.
06:00 Body and arms and half slide rowing are the second and third parts of this drill. The glutes provide the connection between the legs and back. By building up the stroke progressively you should feel the spoon of the blade accelerate through the water - as you add in more body parts this must continue. The arms have to pick up already moving water (from your back swing) and make it faster still. In a crew add in more people so the boat goes faster - notice how your body movements have to change to take account of the boat moving faster. If you aren't adding to the acceleration you should feel that you have no pressure on the end of the blade. Try an exaggeration by rowing at half slide and finish your legs/back/arms at the same time.
The way we teach is designed to work for adult learners. We teach how we row and then make it progressively harder so you can continue to challenge yourself, continue to experiment with ways to make the movement and lastly check your experience with your crew mates - am I getting the right feeling here? Even the most experienced rowers can do these alongside the less experienced.
Do the drills at least 3 times in a single practice so you're familiar with the drill and can see your progress as you do it better each time.
Want easy live streams like this? Instant broadcasts to Facebook, YouTube, LinkedIn. Faster Masters uses StreamYard: https://streamyard.com/pal/d/5694205242376192
Why rowers push the handles down at the catch causing the blade to sky - and how to fix it.
Timestamps
01:00 Roger Watts told me "oars are still creating hazards to low flying seagulls as the right hand pushes forward and down at the catch...." I hope this doesn't apply to you, dear reader.
Skying describes the position of the spoon of the oar relative to the water. As you get close to full slide the oar rises high above the water surface - this is called skying. It's about efficiency - can your oars enter the water when you are at full compression? This gives maximal stroke length. The longer your oars are above the water, your slide comes to full compression and then starts to move back - this means you have less leg drive to use because your knees are no longer at their highest point.
If on the recovery - the bottom edge of your blade clips the water rowers tend to push their hands down towards their legs. Squaring the blade causes skying if they push the handle down when rolling it square. If you carry the oars close to the water on the recovery, there isn't room to square the oar without clipping the water. A lack of awareness of weight in the hand - downward pressure on the handle - if this pressure reduces, the handle rises and the blade tip gets closer to the water.
Keeping the handle at the same height until just before the catch. You won't hit any waves and if the height is correct, you won't clip the water surface when squaring either. The handle should not corrugate up/down during the recovery. Use video of yourself filmed 90 degrees square off to see what your handles do.
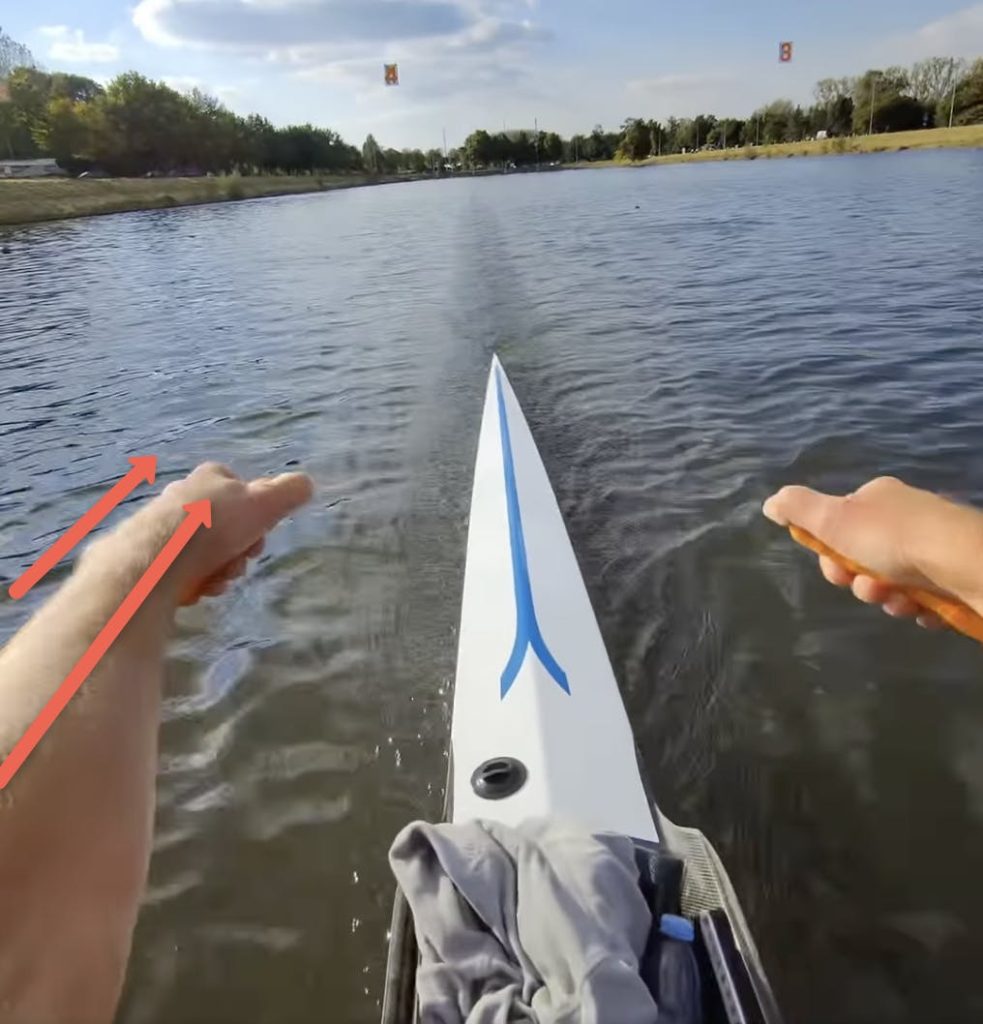
Row with oars flat on the surface of the water during the recovery. The water surface is always horizontal. By pushing the handles along the surface you get a sense of how the handles track when there's no vertical movement on the recovery. The handle height when your oars are on the surface is nearly identical to the handle height on the power phase of the stroke. Watch the path of the handle - look at your hands guiding the oar.
Add visual reference cues - e.g. the view past your hands to something beyond like the rigger. Build the tap down into the exercise - after running the oars along the surface then push the handles down 1 cm, then 2 cm progressively lowering the handle height but try to keep the path of the handle horizontal.
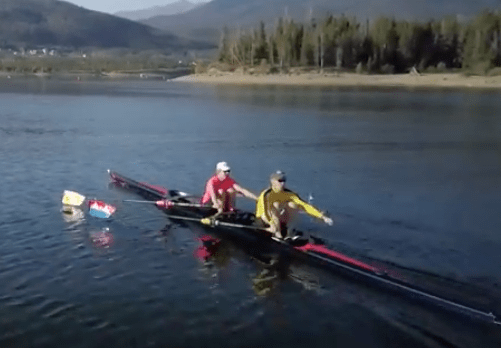
In the article above I recommend using video to assess your oar handle heights. You can also use photos, By drawing parallel red arrows down the shafts of the oars, it's easy to compare each athlete and whether their oar spoons are likely to be close to the water at the catch.
On the oar shafts the lines are pointing to the athletes' hands so you can see where they're out of alignment. then I copied the lines and stacked them one above the other inside the red box to make comparison easier.
This is a very skilled crew and so we're really looking at the smallest refinements of the catch.

Get easy recordings using Streamyard referral link
How to make swapping easier, the differences, visible signs of what goes wrong and drills to help you swap sides and codes.
Timestamps
Masters frequently get asked to swap - first couple of times you are clumsy and have lost fine motor skills. Differences are about oar handling, movements up and down the boat and round the rigger.
Get videoed or ask the person sitting behind you to tell you what they can see.
Practice these in the warmup.
Want easy live streams like this? Instant broadcasts to Facebook, YouTube, LinkedIn. Faster Masters uses StreamYard: https://streamyard.com/pal/d/5694205242376192
I got a question from a Faster Masters Rowing newsletter subscriber And I asked the community how they would help answer their question.
I am a 68 year old recreational rower and not all that stable. I am struggling to learn to back. Some people turn their oars upside down. Some don’t. I have tried with blades squared as usual. But I am missing something. The blades get sucked down on recovery and my balance is worse. There are not many videos out there on backing. Any ideas?
Sometimes it’s as simple as saying that backing is just a stroke in reverse. Hard to believe but true. The reason that the oar is turned upside down is to get the flat side of the shaft pushing on the gate. That way it doesn’t try to turn as you push. Worth noting that you can use full slide going backwards too. When coxing, especially eights I’ll often alternate single full strokes forward and back on opposite sides. It’s a really quick way to spin the boat 180 degrees.
Dermot Balaam
Some people use short choppy strokes some longer when turning. For me slow long strokes are more effective and better balance.
Form your lean back. Take you time, set your blade, the a slow solid, long arms away and body over. Don’t flip the blade upside down, just extra effort.
After you have this turn around, same technique with both blades, slow and solid.
Tom Hury
Keep your hands relaxed in normal 'square position. as you finish the 'backing' drive, reverse feather and bring the handle [s] to your ribs before squaring again.
Lu
Back up now....you are asking me to talk about backing? Okay, I will do my best to say something useful.
1. Is this rower backing all the way to the catch? I back with arms and a just a little back.
2. Go easy. Most of the time we don't need to hurry the backing. For sure practice backing when you aren't being rushed.
3 Practice backing. I try to back into the dock at the end of my rows if there aren't a lot of boats at the dock.
Glenda Howard
How to coach the finish so that your finishes are not frantic, splashy or messy.
Timestamps
Start with the correct set-up at the finish with blades buried. Where are your handles? What's the gap between your hands? This is how you ensure you have room to tap down. If your handles are too close together at the finish, you cannot get out of separation and there's no space to push the handles down without them hitting each other.
02:45 Check your elbows are level with your wrist (or higher) at the finish when the oars are buried under the water. It's hard to tap down if your wrist is cocked and your elbow is lower than your wrist.
Stationary stability drill stage two has a tap down and then feather. Learn how to do this whole crew without anyone holding the boat level for you.
Videos of all these drills are in the Coach Mastermind Group as a joining bonus.
Pause drill at the finish - it helps to check you are finishing the stroke at the right position. Take the oar out of the water and then feather and return the oar to resting on the water surface. The reason is that your handles are at the same height as at the finish. Helps you to check how high your handles are actually rowing to in the full stroke. Goal in the consecutive strokes is to get your handle to the same place before you tap down to extract from the water.
J-Curve Drill - tap down before feather.
During continuous rowing, get your athletes to check handle heights at the finish while rowing - look down or feel where your thumb brushes your shirt. Hold onto the finish for 1cm longer while rowing. Helps them to keep pressure on the spoons until the end of the stroke before the extraction.
A key concept needed for sculling well, this challenging skill is essential for setting up the recovery. One drill to practice which helps teach how to control the oar handle heights.
00:50 Teaching a course for those who can already row and want to try single sculling. There are 4 key concepts for essential skill in rowing and sculling. Weight in the hand is the most challenging key concept.
At its simplest, having weight in your hand enables you to hold your oar handle and keep downward pressure on the handle to keep the oars off the water.
It starts by controlling the finish as you extract the oar using a downward "tap down" of the handle. Use the outside hand in sweep; use both hands in sculling. It helps you to keep your body and the boat stable at the finish and keep pressure on the pin. If your button comes away from the oarlock at the finish you have not got this control.
It also helps to facilitate the transition from body weight into the bow towards body weight towards the stern on the recovery.
If you can do weight in the hand, you can row square blades. And you can feather high over the waves and keep your boat level in a side wind.
The stationary stability drill teaches you how to control the handle using weight in the hand.
Sit the oars square and in the water at the finish. Then press down on the handles twice so just half the spoon comes out of the water. Then do a full press so the oar spoon comes fully above the water and hold this position in a pause, then return the blades under the water. Stage two is to do the same two half presses and a full press and then feather. Stage three is to add straightening the arms after the press down and feather. Your body and legs stay stationary throughout this drill.
Sculling Intensive Camp A self-guided tutorial to improve your single sculling skills over 7 days. Includes drills for the whole stroke cycle including checklists to take in the boat with you.
If you want to learn how to row square blades, take our three-part mini course [free] Square Blades Challenge Part 1.
Want easy live streams like this? Instant broadcasts to Facebook, YouTube, LinkedIn. Faster Masters uses StreamYard: https://streamyard.com/pal/d/5694205242376192
Inspired by an extensive discussion on the Masters Rowing International Facebook group, this article summarises the issue and the advice shared by group members.
If you’ve been sculling for a while, you might have experienced the painful frustration of scraped or “bloody” knuckles. It’s quite common, but it’s not one you have to live with. By making a few key adjustments to your technique, you can keep your hands intact and enjoy smoother, more efficient rowing.
In this post, we’ll explore why scraped knuckles happen and how to prevent them. Whether you’re an intermediate master rower looking to refine your sculling or simply want to row pain-free, these tips give you some things to try.
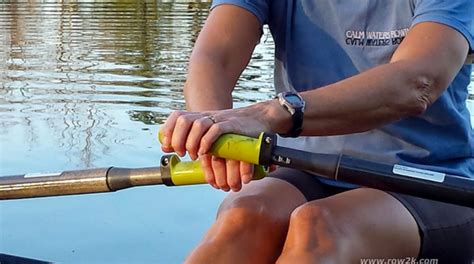
The root cause of scraped knuckles lies in how your hands and the oar handles interact during the rowing stroke, both on the recovery and in the power phase. As you bring the handles toward your body, they overlap at the crossover point. This is the place where the fingernails of one hand can pull over the skin of your other hand.
When sculling, you can choose a couple of different techniques to reduce the likelihood of hazard at the overlap. My favoured technique is to scull with the left hand above and slightly in front of the right hand, so the knuckles of your right hand "nest" into the base of your palm of the left hand - the fleshy part at the bottom of your thumb. This "left-over-right" technique applies throughout the stroke but is most obvious when you handles go through cross-over.
This method is facilitated by the boat rig whereby the left oarlock is rigged 10mm (1 centimeter) higher than the right oarlock. It relies on you being able to scull with the left hand / arm always above the right hand / arm, throughout the stroke, from catch to finish.
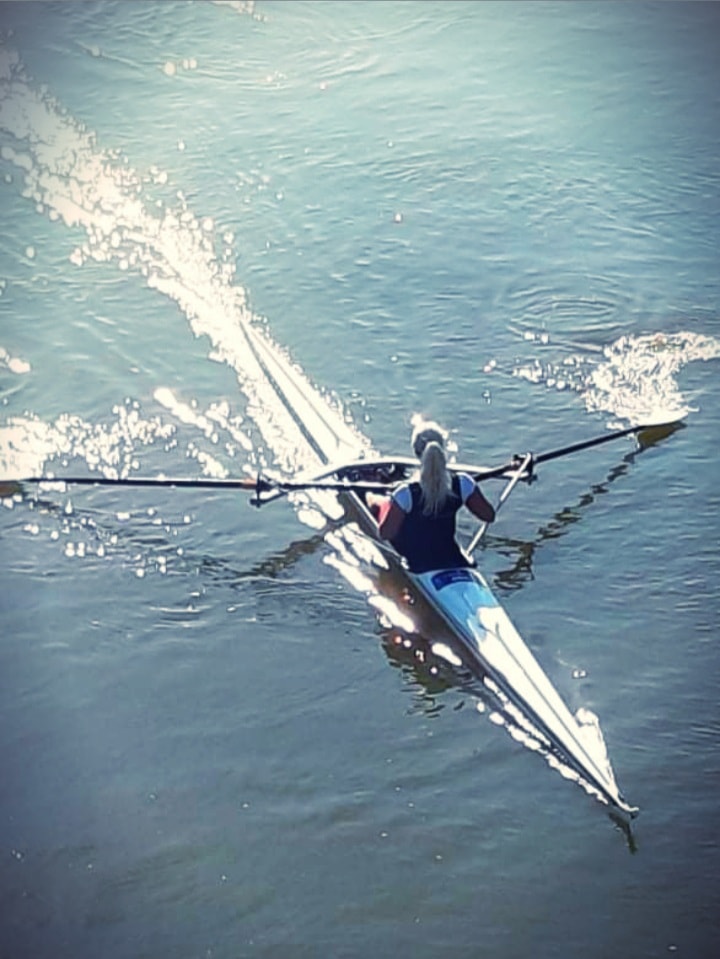
In this still taken from a video, you can see the sculler's left hand is higher than his right hand at the catch. He continues the stroke with the left always higher than the right through to the finish. If I'm being picky, he sculls the power phase left in front of right and the recovery phase with hands stacked one above the other. But this is a minor point of refinement. His boat runs level and he has not got obvious scratches on his knuckles!
Alternative techniques include sculling with one hand directly above the other, sculling with a large vertical gap between your hands at the crossover.
Other contributing factors include:
Scraped knuckles are an annoyance, but they’re also a badge of honour - mostly only scullers get them, not sweep rowers!
By focusing on hand staggering, grip relaxation, and elbow movement, you can row more comfortably and efficiently. As a mid-life master rower, these adjustments not only prevent knuckle scarring but also enhance your overall enjoyment of the sport.
Take the time to refine your technique, and your knuckles will thank you!
How the catch placement changes with the oar angle. Why an acute catch angle with the oar is easier. Ways to adjust your catch technique as the boat speed changes.
Timestamps
When the blade goes into the water at the catch, it needs to be buried rapidly and the curved face of the blade needs to grip the water. the early lock on point is hard to achieve - it depends on how and where you place the blade.
The boat is a single unit moving through the water - water molecules are moving past the boat parallel to the length of the boat hull. The ideal oar placement should have the smallest surface area possible to the direction of travel. At half slide your oar is around 90 degrees to the boat length. It's slow to place the oar.
At the catch, the face of the work going into the water is reduced to around 15 cms compared to half slide. At the extreme, if the oar is parallel to the side of the boat - this reduces to about 1.5 to 3 centimeters width.
07:00 The smaller the face of work of the blade to the water, the easier the blade goes into the water. When the blade is in the same plane as the water movement, it goes in easiest. At very short strokes - arms only - it's hard to place the blade. With the smaller face of work area at the catch, using an acute angle, it feels easier to place the blade.
From half slide to the catch, your legs and seat move in a straight line up the slides to the catch. However your handle(s) are pivoting around the arc of a circle centred on the pin of the oarlock. Your body in sweep rotates around the pin - keep your shoulders parallel to the oar handle and let your eyes look out on your side of the boat - this helps create more rotation because your body follows where your eyes are looking. In sculling both your handles are pivoting around the arc of a circle - your arms move further than your legs from half slide to the catch. In effect there are 2 speeds on the recovery - the seat speed, and a faster speed of your hands leading the oar handles around the pin and upwards to place the oar under the water. By allowing your arms to go wider at the catch in sculling, you will get a more acute catch angle. Row longer by thinking about your arms, separately from your body.
When the boat speeds up and rate increases, you have less time per stroke to anticipate the catch. Often stroke length shortens as stroke rate rises. Counter this by moving your thinking earlier in the recovery. This gives you more reaction time. You need to move your body proportionate to the rate - as rate rises your body speed also increases. When you get the catch timing right the catch can feel very light (not heavily loaded on the blade).
16:00 Train yourself by trying a drill. Go from full slide to half slide - it gives the impression you're rating very high. Prepare early at half slide so you don't miss water at the catch. Then try to maintain the same boat speed you had at full slide. You move dynamically off the catch placement.
Want easy live streams like this? Instant broadcasts to Facebook, YouTube, LinkedIn. Faster Masters uses StreamYard: https://streamyard.com/pal/d/5694205242376192
Join our community and get our exclusive Faster Masters Rowing Magazine, packed with tips, techniques, and inspiring stories. Includes four new articles monthly.