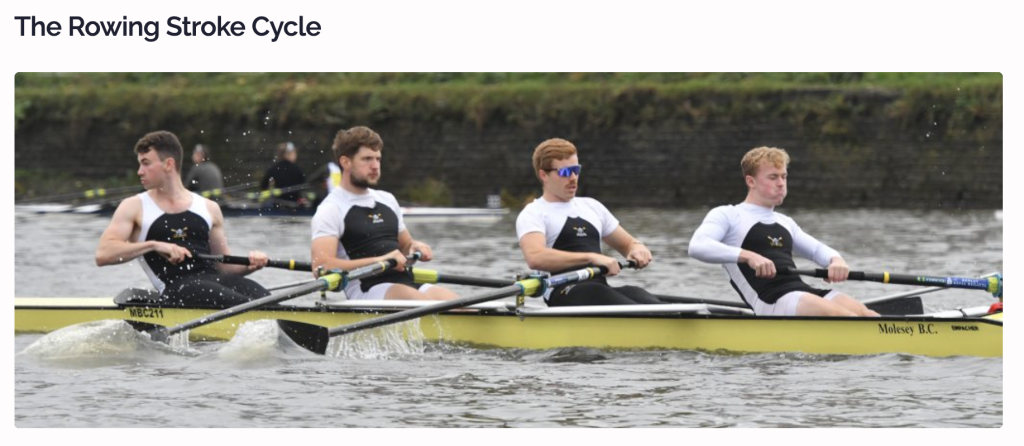
The most experienced rowers aren't thinking about every movement: they are hitting three key checkpoints only. The finish, quarter slide and three quarter slide.
Timestamps
The finish is the only point where the boat, the blades and your body are all travelling in the same direction (the direction the boat is moving in). This gives the finish a stillness where you can be relaxed and sit still - the work is done. You should feel balanced and symmetrical with a low centre of gravity. This is the most stable part of the stroke.
Your posture contributes to the stillness - an open chest posture. As your hands move away the finish is over and your mass starts to move up the slide towards the stern (opposite direction to the hull movement).
You feel incontrol of time - if you feel rushed in the recovery use this point at the finish to reset.
Recommended drill - single strokes to the finish. Leave your handle(s) next to the body, feathered.
Here you have the body set in the catch angle - this is so you can begin to feel the boat moving under you. Recover your body mass and start it moving towards the stern.
Your handle continues past your knees at this point - as a consequence this draws your shoulders forward and your trunk rocks naturally. You are nearly in the catch position (except for your leg compression). If you don't get your handle past your knees you tend to row upright and don't get the trunk movement and you rock late in the recovery which disrupts the boat. If you lift your handle too early later on you have to push it down to give room to square - another disruptionIn sweep at quarter slide your nose, chin and sternum line up with your inside knee.
Recommended drill - row pausing at quarter slide checking you get into the right position at the pause.
This is the 'danger zone' where hull speed gets lost. Your mass is 5-7 times the mass of the boat hull. If you are sliding faster than the hull your mass works against the boat. Going fast up the recovery slows your boat.
Imagine doing a squat jump - if you descend too fast and drop your weight to the floor makes you feel heavier on the floor making it harder to jump up again. This is similar to rushing the slide.
Things to check at 3/4 slide - is your handle height low enough for you to square if needed? Is your upper body relaxed with minimal pressure on the footstretcher? Feel the boat is free under your feet.
Test this by rowing at 3/4 slide and then return to full slide. If your boat speed is the same at 3/4 and at full slide it's a sign you could be more effective at 3/4 slide.
Your centre of mass needs to be low in the boat, your torso should not be braced - it's in the same posture as at quarter slide.
Recommended drill - shadow rowing drill. Row the recovery without holding the oars. Try shutting your eyes. Call out each position as you go through it - finish, quarter slide, three quarter slide. Naming the point helps.
Summary
The finish resets you and gives you time, the quarter slide sets your body before the boat begins to move and three quarter slide is where you preserve or lose hull speed. When you get tired or under pressure that's the moment to focus back into these three points.
Watch on YouTube
Listen on SoundCloud
Learn steps towards getting a good catch using drills.
Timestamps
00:45 Am I done learning the stroke yet? Asked an athlete.... only once!
The catch is challenging to learn - supporting your learning with drills means you can self-coach as well as getting coached.
Michael sends his crews the drills video the night before practice. Athletes need to know what to do in a drill and (importantly) why they are doing this drill. There are two main types of drill - exaggeration drills and isolation drills.
This is where learning the catch starts - the height of the handle has to be understood so you know how high/low the handle needs to be. Describe the stroke cycle in high/low handle heights including the "ramp up" towards the catch position. Learn this stationary in the boat. When the oars are flat on the water at the catch, the handle height is the same as when the oars are squared. Teaching how to arrive at this height the drill is "Slap Catches" so the athlete knows the precise moment their handle reaches the correct catch height - and the aural sound helps to align timing on both sides of the boat. Learn when to go up "the ramp".
You have to actively lift your hands to make the catch 'shape' with the handle. Learning when and how to do this is the next stage in progressive learning. After squaring the blade, if you make the catch shape too early, the oar hits the water.
If you square and your handle is too high on the recovery the oar will hit the water. An early square helps and you can figure out how high (low) the handle needs to be on the recovery so as to not hit the water. When to make the shape? Use the second drill - backsplash drill - so the lower edge of the oar hits the water just as the handle lifts. You can hear and feel the backsplash.
This is relative to your body movement and the seat. Your seat is a good proxy for body movement because there's a short moment when the seat rolls forward and stops as it changes direction. That's when you need the oar to already be under the water. The third drill (sweep) is to row with inside hand holding the back of the seat so you can tell when it changes direction. In sculling row with one oar only (someone holds the boat level). Watch the height of your knees too as this is also a good visual marker.
Our discussion continued around ways to keep handle moving towards the stern while placing the oar at the catch. This series can be learned in a few practice - do two each time you go on the water. Take care that you understand the why as well as the how.
Want easy live streams like this? Instant broadcasts to Facebook, YouTube, LinkedIn. Faster Masters uses StreamYard: https://streamyard.com/pal/d/5694205242376192
When I published the pause drills video I got some great questions from Dale W. First watch the video in which I explain 3 pause drills and how they help your rowing and sculling stroke.
Dale writes
I like that you say you go through each of the pause positions several times when taking the continuous strokes so it's good for practicing position.
I like that you talk succinctly about what you're doing and don't use a lot of filler about non-relevant stuff. Thanks
Dale W, Faster Master Rower
- Why do you use 'finish' instead of 'release’? I think this is British English versus US English usage.
- if one is pausing at the release with the blades on the water - does that mean they're feathering straight out of the water instead of releasing square and then feathering? - which would put the blade in the air at the pause and the hands slightly in front of the body? Correct. the point of pausing with blades on the water is that it’s NOT the correct sequence - BUT it teaches people to finish the handles at the correct height and emphasises the elbow position. Too many folks finish with handles down in their lap and the oars drift out of the water rather than a defined movement.
- Does feathering involve the fingers/hands/wrists/elbows? Watch this video
- What should things feel like at each of these positions? I can't answer that you have to experience it.
- When the arms are paused away, are the shoulder blades released or kept in place until the body pivots? Kept in place.
- When moving the body over, do the hips move or just the body? Hips move
- Does one do 100% of each position before doing the next motion while continuously rowing or is it just for drills? EXCEPT for the pause with blades on the water, you do 100% of each position before doing the next motion.
- When does one roll up? Early enough to be ready for the placement into the water
- Are the feet doing anything? Pressing into the foot stretcher through the soles.
- I like that you talk about how people can check their positions at each pause - what should one be checking? Watch carefully I explain each position you’re checking that you ARE in that position.
What's the drill for? How to use it to improve your skills and errors to watch out for.
Timestamps
We do them for crew alignment, blade handling, technique, isolating part of the stroke or exaggerating part of the stroke to amplify its effect. The pick drill sequence - often used as part of the warmup.
This starts at the catch - sitting at full compression. Start with a very short stroke (2 inches of the slide). Some like to start with a blade placement before this stage.
04:45 What's the drill for?
1) Placing the blade before the leg drive begins. Some people assume the blade placement and leg drive are simultaneous. They are not. These are sequential movements - on the recovery your hands move upwards so the blade goes down towards the water while still moving forwards on the slide.
2) Get the correct sequencing off the catch - legs initiate the drive and back/arms follow.
The effect of this drill is to make a longer stroke if the blade is placed more rapidly and closer to full compression on the legs (so you miss less water). It helps to align the leg drive of the crew.
Coaches - view your crew from 45 degrees from the stern to watch their knees rising and falling through the stroke cycle. Video the crew before and after the drill - their knees press down in the power phase more in time with each other. When to coach an individual versus whole crew.
08:15 How to teach the reverse pick drill
You need to slow it right down and, if possible, in a stable environment with half the crew sitting out. So others can use square blades.
Rehearse each of the static positions slowly with the boat stationary. They must all know these first - start at the catch (blade square and buried); move to 2 inches from the catch; one quarter from the catch; half slide from the catch; three quarters slide from the catch; legs only. [Watch for people swinging their back - this is not needed at this stage.] Straight arm rowing and finally adding the arms so you end the drill at the finish position with the blade still buried under the water. Rehearse each several times.
10:30 Start to do the drill at the catch placement into the water with raising and lowering the blade in and out of the water. Watch for shoulder shrugs and folks using a back swing to place the blade rather than the arms lifting moving alone. Move onto 2 inches on the slide. Show the athletes how to push on the foot stretcher to initiate the drive phase. Emphasise the hips driving backwards and the body angle doesn't change.
11:30 Many people find it difficult to separate the leg drive from the body swing. Watch for chins lifting if this happens.
12:15 Best not to do more than 10 strokes at each position. It's a lot of load on the body. The gearing is heavy which helps them to feel the blade in the water but beware causing back strain. Inflexible athletes will find it hard to get into these positions, especially if hip / pelvis mobility is restricted.
Article on easy setup for comfort in the boat - Adapting rowing for masters physiology.
Join in the rest of the crew progressively so that the people who have done the drill are are focused on their catch and leg driven power phase - as the boat moves faster, they will find it more challenging to get the same feeling of placement and "grip" on the water before it moved. They can anticipate the catch and adjust their timing to keep the feeling of load.
15:00 Repeat the drill three times during an outing.
Teaching it on the land first using an erg can be helpful as you can get up close and position an athlete's body. How to get the athlete to learn the leg drive using hips first.
16:00 Errors to watch out for
18:30 This drill benefits from frequent practice. Maybe use it in your warm up or on the erg.
The benefits of drills and ways to improve your rowing boat skills.
02:00 Skills in the boat.
You have to spend time in the boat to acquire skills. What is your available time for practicing? Choose frequency over long outings. If your crew practices 3 times a week, can you add in a short single sculling outing alone to develop your skills?
Use structured exercises to learn the pattern. Execute all your drills to a high level of skill - move carefully and deliberately.
05:00 Check your static position first at the finish at the start of the outing. Re-check each outing, especially if your crew lineup has changed.
06:15 Have a plan. Don't just go through the motions thoughtlessly.
Pick drill has a purpose. It's a drive suspension drill and also to warm up your body. Be mindful in the boat with your movements. Develop your skills - check your adjustment each outing. Rushing into the outing may not be helpful.
08:30 Skills progression for masters rowers. Faster Masters has written a progression of skills from Beginner, intermediate and through to advanced skills. This is the first time we have ever seen a detailed list which athletes can use to track their progress - tick each one off as you learn.
10:00 How a coach can use the skills progression with a group.
Know what each athlete needs to learn NEXT. More experienced athletes can process more coaching input. Beginners don't need the why. Just orient them to the boat and the stroke to begin with - introduce the why later on. When the coach focuses on the least experienced first it can mean the more experienced don't get coached.
Different skilled athletes in one crew, use the drill to coach both inexperienced and experienced people giving them both something to work on in the drill.
16:00 Getting a new crew together using these four drills to align stroke patterns.
How to get the skills drill progression document. It is part of the Masters Coaching Certification course.
Going deep is a common technique issue, as is "corrugating" through the drive where the blade goes deeper and shallower. In this podcast Marlene and Rebecca discuss how to get a horizontal drive in the rowing and sculling stroke.
02:00 Why it matters? Stroke length is important for rowing and sculling. How long the blade stays in the water at one depth. If your depth varies you have a shorter stroke.
05:30 Coming over your knees the blade can go deep. Also on the placement if can go deep if you shoulder lift to place the oar.
07:30 Tape on the shaft at the correct depth is a useful visual marker.
09:00 check your rig FIRST.
Oarlock height is key. In 1x at the finish check the handle height while stationary - your forearms should be parallel to the water.
13:00 Drills to stay horizontal.
1) One finger rowing drill - what it feels like to stay level on the drive. Draw through with only your middle finger on the handle. The water supports the blade to stay level - if you allow it.
2) Aim for where your knees were. Drive your knees away from your chest and keep your body leaning forward at the catch angle.
3) Row with blades flat on the water to see where the handle is at the catch against a visual marker. Your handle stays the same height through power phase and recovery during this drill. You can do this on erg - use tape to mark the chain / handle height
20:00 Benefits of staying horizontal. Get a longer drive. Look at your blade to check as you re-pattern your movements.
Continuing our series about the rowing and sculling stroke and what each phase should look and feel like plus drills on how to coach yourself to improve.
02:30 This Past Week - what we do to advocate for masters rowing.
Organising groups of different skills
Crew racing lineups article.
09:00 Jess Di Carlo reviews book of the month Socrates the Rower. Rowing as stress relief.
See more rowing books on our blog.
Building power as you move into racing.
Technique for the drive:
Get the blade into the water.
Mechanics - move the boat past the blades and not pushing the blades through the water.
Focus on lower body - legs, hips and push on the footstretchers.
Maximise stronger muscle groups and use them first.
Pressure on the handle and footstretcher are the same.
Read and watch the full video series on the rowing stroke cycle - 6 episodes from catch to finish.
Get feedback by checking your oar shaft. Look at it.
Is it changing blade depth? this shortens the time in the water.
Wash happens if you don't extract the blade at the right time.
Slip is if you don't have purchase on the water at the start of the drive.
Purchase at the catch is sometimes called grip on the water.
22:00 Practice rowing feathered on the drive to find the correct height of your handles.
Identify a visual reference point to check you have the correct height.
Initiate the drive with the legs and hips and later bring in the body swing.
Pressure on the foot stretcher - the whole food goes flat on the footstretcher - this is the moment to bring the body swing in.
25:50 Swing through the perpendicular point of the oar handles.
As you do this you start to bend your elbows.
The blade is moving to the pin at this point.
Continue to hold pressure so the blade doesn't tear the water.
If you lose the pressure that hurts the release.
30:00 Practice the drive - legs only rowing.
Add resistance with a bungee.
A good way to get more proprioception into your joints.
34:00 Push a refrigerator
Activate the glutes - this supports the lower back
Activate the lats - this gives a solid shoulder girdle
Together these solidify the torso for the drive.
36:30 Drill - finish all three at the same time - legs, back and arms.
Exaggeration drill - do for 10 strokes
This teaches how you can adjust your movements.
38:15 The result is shown in your puddles
They should be tight dark circles.
39:30 An exercise for swing and rhythm.
Learn to trust your blade. Get your head out of the boat and stop looking down.
Put the blade in the water and look up at the sky. Add your head mass to the leverage.
43:00 The boat is stable when the oars are in the water.
We continue our series exploring all the parts of the rowing stroke.
04:00 This Past Week - what we do to advocate for masters rowing.
10:00 The coxing "plank" and the shoe straps
13:40 The recovery begins when the blade exits the water and continues until it returns into the water.
In practice, I teach it as the beginning of when the knees rise on the slide.
16:30 You've done the preparation for the catch already. Simplicity is key.
Let the wheels of the slide move and only your legs are changing position.
Feathered blades on the recovery and your wrists are bent
You need weight under the handles
Level out the back of your hand and forearm
In sweep use the outside hand to keep weight above the oar handle.
The square up can mess with the rhythm
The point at which you release. your knees - you don't need your body fully over until quarter slide. We prefer that your hands are past your knees and the body has shifted to rock forward.
Read and watch the full video series on the rowing stroke cycle - 6 episodes from catch to finish.
23:45 Release the knees gently. Bring the boat underneath you.
Get the arms out first - the handle leads the recovery.
Focus on the slide seat rolling past.
Be poised and relaxed.
Deactivate the muscles and remain poised without tension.
Strength training can teach you how to activate and release muscles.
34:00 The jelly legs exercise - Rebecca explains how to teach this and practice it yourself.
38:00 Slide in time with the boat. Feel the glide.
Give your muscles the rest so as to gather energy for the top of the slide.
Don't chicken out at the top of the slide. Recovery continues until the blade is in the water.
Continue to compress - you're slowing down. Stay on the arc around the pin especially in sweep.
41:00 Decrease your tension by 1 percent.
Practice this in your crew all rowing together - you can't get the feeling with only half of you rowing.
The Stroke Cycle - recovery
Motivation is tough in winter, especially if we can only train on the indoor rowing machine.
Support this show with a donation https://fastermastersrowing.com/podcast
01:00 This Past Week - what we do to advocate for masters rowing.
Marlene's article in Rowing News Magazine e-news - Self improvement 101
05:45 Masters Rowing Survey This will take 10 minutes max. It's a global survey on the state of masters rowing and is multiple choice, mostly.
Make your erg work up into a series of mini challenges
Alternate exercises on the erg
20:00 Staying on track during the holidays. Plan to train.
Keep the intensity up 2-3 times per week. Shorter workouts
Go to the party but plan to train the next day. Don't worry about going off track. Have fun.
Be measured if you choose
3 tips for setting up your erg / indoor rowing machine correctly so that it is "like your rowing boat".
Support this show with a donation https://fastermastersrowing.com/podcast
01:00 This Past Week - what we do to advocate for masters rowing. Speaking at the US Rowing Convention, CRASH-B erg training program launch
06:00 Setting up your erg
Resistance - the drag factor on Concept2 erg, Water rower, RP3 and Rowperfect. C2 drag factor is 100 - 110 or 115 for masters.
Comfort - set your seat and foot height to avoid lower back load and over-use injuries
12:00 How to set up your erg to be like your boat - single scull. Do short 250m pieces at firm pressure low rate, come into the dock and get on the erg (also on the dock) and row 250m at similar pressure and rate. Do they feel the same? If no, adjust the erg damper setting and drag factor.
Fixed Head rowing machines versus floating head rowing machines - what's the difference? How does it affect the set-up?
14:30 Why am I doing better splits on a resistance 10 than 4?
23:00 Monitor height - set it for a "long core" posture as advised by Baz Moffat
A good drive reduces the "slip" in the chain and increases your effective leg power in the rowing stroke.
37:00 Coffey Simulatoar - set the inboard of the sculls to match your boat.
Bio Rower - set the finish / release position correctly to match your boat.
Join our community and get our exclusive Faster Masters Rowing Magazine, packed with tips, techniques, and inspiring stories. Includes four new articles monthly.